Showing posts with label Savory. Show all posts

Sunflower Cheese Ball with Olives

Print Friendly Version of this pagePrint Get a PDF version of this webpagePDF
Sometimes I find a recipe, make it,  and my family loves it.  It becomes an instant hit.  Then I make it just about every week, or at least every month, until another recipe comes along and replaces it.  Sometimes, there is no replacement, but the recipe just doesn't fit as well in with the season.  As it is made less frequently, I might forget about using it.  Then one day, something reminds me of that favorite recipe.  I ask myself, "Why haven't I made that in forever?"  This is one of those recipes.


Cheese balls may seem so out dated, but this is really a good combination of flavors.  The olives are a great accompanying taste to the mild cheese.  The thing I really like about this cheese ball is the coating of roasted sunflower seeds.  Most cheese balls are covered with pecans or walnuts that are coarsely chopped.  The sunflowers are tender, both in texture and taste.  This is a terrific treat to make and have on hand for a spring time snack or for nibbles with some friends.  It is a great make ahead recipe for a shower, too!


Sunflower Cheese Ball
original recipe from allrecipes.com
8 oz cream cheese, softened
2 tsp Dijon mustard
2 c shredded Monterey~Jack cheese
1/2 c sliced green olives with pimentos
2 tbsp chopped green onions
1/2 c salted, roasted sunflower seeds
crackers {recommend pretzel thins}

Beat cream cheese and mustard until smooth.  Stir in the cheese, olives and green onions.  Shape into a ball.  Roll in sunflower seeds.  Refrigerate until time to serve.  Great with crackers, pretzel things and crisp veggies.

1.  Place the combined ingredients for the cheese ball on plastic wrap {makes it easy and neater}.


2.  Using your hands, gently shape into a ball.  Quick transformation from blob to ball.

3.  Sprinkle toasted sunflower seeds around ball.  Gently roll around to cover cheese ball with seeds.

4.  Refrigerate cheese ball til time to serve.  Transfer to serving plate.

5.  Surround with crackers or pretzel thins.


Tips and Tricks~
*Work with the cheese on plastic wrap.  Sprinkle seeds around and roll to easily cover cheese ball.
*Serve with carrot and celery sticks for a gluten-free or low-carb treat.
*Substitute other herbs in place of the green onions.  Try parsley or chives.
*Instead of a cheese ball, mix up the ingredients without the sunflowers.  Top pieces of toasted bread that have been cut into spring shapes with cookie cutters for a spring tea sandwich.

TJ's has my favorite pretzel thins, Everything Pretzel Thins!  Great with a cheese ball.

Make Ahead Brunch~ Simply Elegant Crab Strata

Print Friendly Version of this pagePrint Get a PDF version of this webpagePDF
I used to have more time to plan somewhat lavish meals for guests.  Like having 70+ people over without catering, making all the food and decorations myself with the help of one or two of my daughters.  Those times seem to be fading quickly into the abyss of my blog and memory.

Sometimes the simplest gatherings are the most gratifying for me and most pleasing for my guests.  But even the simplest gatherings should have something special.  And special doesn't have to be labor intensive.  Not even for an Easter brunch or a spring bridal shower.  Really!

Two things to keep in mind are:
1.  Use dependable recipes.
2.  Use quality ingredients.

I have your covered on the first.  The second is up to your local grocery, and you.

This recipe comes from a small recipe book from my favorite B&B.  The collection of recipes is very much like one you would get from the ladies group at a church.  They are pretty simple, with just one short paragraph of instructions.  It is so simple, that many may overlook it when selecting an elegant dish for their spring entertaining menus.  But it really deserves more than your consideration.  It is delicious.

Remember, use quality ingredients.  Using fresh and quality ingredients can almost always change any recipe into a star, even if you aren't a top chef.  Trust me, I know from experience.  So, before your begin, shop for your ingredients.


Fresh Produce
Use fresh lemon juice instead of bottled.  Mince your own onion, don't use onion powder.  Chop up some CRISP celery.  Keeping your celery in water in the refrigerator keeps it crisp.

Flavorful Cheese
You may be tempted to skimp here, but use some nice Irish cheddar or something that is an aged, good cheese.

Good Crabmeat
Use lump crab meat that you find refrigerated.  Not imitation.  Not frozen.  Not next to the canned tuna.  I use Philips. It's good.


Now you are ready! Assemble the strata the night before.  Put the dish, uncovered, a cold oven.  Heat the oven then begin timing from there.

And be ready to give out the recipe.  Everyone will want to make it once they find out how easy it is.


Simply Elegant Crab Strata
1 small loaf fresh sourdough bread, cubed {about 8 cups}
1 lb lump crab meat
1 c chopped celery
1 small sweet onion, chopped
1 Tbsp Dijon mustard
1/2 c real mayonnaise
juice from 1/2 lemo
1 tsp hot sauce
2 c grated sharp cheddar cheese
8 eggs, beaten
2 c milk

Grease a 9x13 or a 3 quart casserole dish.  Spread the bread cubes in the prepared dish.  In a large bowl combine crab, celery, onion, mustard, mayonnaise, lemon juice, and hot sauce; stir well.  Using a blender or food processor (even a hand mixer), combine eggs and milk well.  Add the egg mixture to the crab mixture and stir well.  Pour over top of the bread cubes.  Top with shredded cheese.  Cover tightly with plastic wrap and refrigerate over night.  In the morning, place dish in cold oven.  Heat oven to 350F.  Cook for an hour from the time oven reaches 350 or until lightly browned.  Serve with additional hot sauce and lemon wedges.


Note- I made this recipe and divided it into two dishes.  But, I recommend using just one 9x13 dish.

Easy Savory Chicken Thighs

Print Friendly Version of this pagePrint Get a PDF version of this webpagePDF
Necessity is the mother of invention.  Necessity is also the mother of many of my easiest yet favorite recipes.

Preparing dinner is perhaps the most difficult task of my day though planning meals is rather relaxing for me.  I can plan menus easily while entertaining a curious toddler or keeping a climbing baby safe.  I can even write up my weekly dinner plans if I feel miserable and need someone to take care of me.  But making dinner with these distractions is another story.


I planned to make chicken enchiladas, one of our family favorites.  Plans changed, more than once.  After getting the children settled enough to work on dinner, I suddenly felt miserable.  Miserable as in I-can't-make-dinner miserable.

Plan B was to make enchiladas but without much effort being put into preparing the chicken.  I used a simplified method from a more complicated recipe I found for braised chicken.  While the chicken was cooking, I felt less and less like finishing dinner.  Plan C~ use chicken as is.  Dinner would have to be very simple.

How do you measure the success of the meals you make for your family?

I have a scale for measuring my success with a meal that is completely based on my husband's reactions.  If he describes it as 'really good', it was a scrumptious meal.  If he informs others at the table that no knife is needed, the meat is a savory masterpiece.

Dinner was completed with rice {prepared in the rice cooker} and some oranges.  This lazy meal was at the top of my simple scale.  My husband informed the children they didn't need knives because the chicken 'is really tender.'  He even illustrated for my six year old how easy it was to pull apart.  He reminded all more than once that no knife was needed.  And a few times he said, 'The chicken is really good.'


Tips and Tricks~

*Simple steps to savory chicken~ season, sear and roast.
*Change the spices to your liking.  I came up with this spice mixture because I planned to use the chicken in enchiladas, but the cumin and onion powder happen to be two favorite flavors.
*Need a bit more time before you can serve dinner?  At the end of the cooking time, it does not harm the quality of the chicken to leave it in the oven for up to 20 or 30 minutes.  Turn the oven off and keep the lid on the pan.
*Used boneless, skinless chicken thighs but could do this with other cuts of meat such as chicken breasts or pork chops.
*Excellent way to cook chicken to use in other recipes such as enchiladas or casseroles.  Very flavorful and tender.


Easy Savory Chicken Thighs

2 tbsp olive oil
6~8 boneless, skinless chicken thighs
1 tsp cumin
1 tsp onion powder
1/2 tsp salt
1/2 tsp thyme
1/2 tsp pepper
large sweet onion, chopped

Preheat oven to 325F.  Combine cumin, onion powder, salt, thyme and pepper.  Heat oil in dutch oven {which has a lid} over medium~high heat.  Add chicken thighs and top with mixed spices.  Brown for 3 minutes then turn chicken pieces over.  Top with chopped onion and brown for 3 minutes.  Cover and transfer to preheated oven.  Cook for 1 hour.  Serve over warm rice with a side of fruit or vegetables for an easy dinner.


Savory Salmon Spread

Print Friendly Version of this pagePrint Get a PDF version of this webpagePDF
When choosing an appetizer or snack to have for small gatherings, I will often choose something that is served warm like spinach dip or meatballs.  Often I will need something a bit lighter before a full dinner though.  Sometimes I'll choose a seafood based appetizer when I need something lighter, like this crab salad.  But more often I want something even simpler.  One of my favorite snacks that is simple to pull together and is served chilled or at room temperature is Savory Salmon Spread.  It is perfect as an appetizer before a spring-time dinner, especially Easter or a Sunday brunch.


The flavor improves as the ingredients sit together, so I suggest making the spread the night before or at least two hours ahead of time.  Another tip~ use a stand mixer with the paddle attachment to blend the ingredients.  So easy.

I usually serve the spread with buttery crackers but it is just as scrumptious atop cucumber slices.  Low carb and gluten free!  I am partial to the canned tuna.  I know, lack of sophistication.  I think those who want to make this a bit more elegant can easily substitute about a cup of shredded smoked salmon.  I've even served this spread in mini fillo shells topped with some scallions for a bit more pizzazz.  This is a base recipe that can be adapted to your needs and tastes.  Enjoy!


Use mini cookie cutter to cut out cute spring~time shapes of cucumbers.


Pie shape cutters work too!

 Keep cut cucumber shapes in a glass jar filled with water in the refrigerator until serving.  Cucumber will be extra crispy!


Savory Salmon Spread
2 5 oz cans boneless and skinless salmon, drained with some liquid reserved
1 8 oz block of cream cheese, softened
1/2 tsp onion powder
1/4 tsp dried dill
pinch of salt
pinch of dried thyme

Blend all ingredients together well.  If too thick, add a bit of reserved liquid to thin.  Chill at least 2 hours.  Set out about 30 minutes before serving to soften.  Serve with buttery crackers or cucumber slices.


Mom's Crab and Corn Chowder

Print Friendly Version of this pagePrint Get a PDF version of this webpagePDF
I don't remember what started the search for 'The' crab and corn chowder recipe, but I know I did search.  And I tried a few that looked really good.  Only one of them really satisfied what I was looking for~ creamy, thick, scrumptious and relatively easy.  Unfortunately, I pretty much lost it and couldn't remember which recipe was it.  Honestly, I think that I made some adjustments to a recipe that would make it fit into my needs.

So after again trying some of the recipes I found and not really feeling that any where 'The' recipe, I came up with my own.  And from the first attempt, it has always been a hit with my family.  Since it is a recipe I made up as I went along, the children call it Mom's Crab and Corn Chowder.


And they lament that there is never any leftovers to speak of.  At dinner one night, my daughter claimed any remaining chowder for her lunch the following day.  To her disappointment there were about two spoonfuls.


That brings me to the subject of 'servings' for this recipe.  I've never measured it so I will guestimate that is makes about 8~10 servings, which is enough for our dinner table.  The only difficult thing about making the chowder is the price of crab.  If you want to make the crab go a bit further, you could use more flour {say 1/2 cup} broth and cream to stretch it.  Also, fill in with more potatoes.  We like to keep it like this, with lots of crab though.  It's our cold weather treat!


I think one of the greatest compliments I ever received related to my cooking was from my mother-in-law about this chowder.  She's from New England so seafood is home to her.  One day when I was responsible for her meals for a few weeks, I brought some of my crab and corn chowder to her.
 A week or so later, she said, "You know, you could make that crab and corn chowder for me again sometime.  I really liked it."  From a New England gal, that was a real compliment.


Mom's Crab and Corn Chowder
4-6 new potatoes, chopped {about 2 cups}
½ c butter
1 small sweet onion, chopped
1/3 c flour
2+ c chicken broth
2 c half and half
2 tsp crab seasoning {such as Old Bay}
1 tsp sea salt
1 tsp pepper
1 tsp dried thyme
1/4 tsp cayenne pepper
1~2 bay leaves
16 oz  frozen sweet corn
16 oz lump crab meat
scallions
shredded cheddar

Parboil potatoes*; immediately submerge in cold water to stop cooking.  Set aside or in the fridge until ready to add to chowder.
Melt butter in dutch oven on stove top; add chopped onion and saute for 5 minutes or until translucent.  Stir in 1/3 c flour; slowly add 2 c chicken broth, whisking.  Slowly stir in 2 c half and half; season with salt, pepper, crab seasoning, cayenne, thyme, and a bay leaf.  Add parboiled potatoes, frozen corn and crab meat; simmer over low heat, stirring occasionally for 30-45 minutes.  Add more chicken broth to thin if needed.  Remove bay leaves before serving.  Garnish with shredded cheddar, sliced scallions and crab seasoning before serving.


~Tips and Tricks~
*To parboil, bring a pot of water to a boil, add diced potatoes and let boil for 5 minutes; rinse in cold water to completely cool and set aside til ready to use.
*To keep half n half from curdling, measure out the needed amount before you start cooking.  Let it set on the counter to warm up to room temperature.  Or at least slightly so it isn't refrigerator cold when added to the chowder.
*Since we use whole milk, I don't buy half n half.  I use a lot of whipping cream in cooking and baking.  To make half n half, I just combine equal parts of cream and whole milk.
*Fresh corn would be so delicious in this, but I make this quite often in the winter so use frozen corn.  If you make during season, I suggest fresh corn off the cob, about 3-4 cups.

Reuben Dip~ Just Like the Sandwich But Easier!

Print Friendly Version of this pagePrint Get a PDF version of this webpagePDF
Reuben sandwiches, loads of corned beef with Swiss cheese and cabbage, are the essence of a game night for me.  Have you ever tried to make Reuben sandwiches for a crowd, though?  It's not too easy.  Here's a great alternative and one of the best last minute dip recipes~ Reuben Dip.  Ingredients are readily available at your local deli, and the dip can be made quickly.  Either cook it in the oven or in the slow cooker, which is useful in keeping the dip hot throughout the game.


I will often grab the corned beef from the deli, but if you have leftover corned beef, it would be excellent in this dip.  Another way to fancy up this dip is by making your own thousand island dressing.  Simply combine mayonnaise and ketchup in a 2:1 ratio then add about some chopped up sweet pickles and pimentos.  Of course, to keep it last minute friendly, just use the dressing from the bottle.

Serve with traditional pumpernickel or dark rye bread.  Another easy option is using the pumpernickel or rye cocktail bread.  They are dip~serving~size already.  If you want this to be over the top scrumptious, serve it with everything bagels.  Just cut them into big bite size pieces.  The chewy bagel with all the onion flavor is sooooo good with Reuben dip.  And to satisfy those who want a crunch, use everything bagel chips.  Having some sweet gerkins and extra dressing on the side is a must, too.

Off to win the next bout of Twister.  Oh, did you think I was talking about a different kind of game?  Well, this dip is a winner for any kind of game.


Reuben Dip
16 oz sauerkraut, drained
8 oz cream cheese, cubed and softened
3/4 lb corned beef, {about 3 c} chopped or shredded
1/2 lb shredded Swiss cheese {about 2 c}
1/2 c Thousand Islands dressing

Combine all ingredients by hand or with paddle attachment of mixer.  Spread in 2 qt baking dish or two smaller dishes.  Cover and cook in 375F oven for 25~30 minutes, or til hot and bubbly.  In slow cooker, heat on high for an hour; reduce temperature to warm once melted and stir before serving.


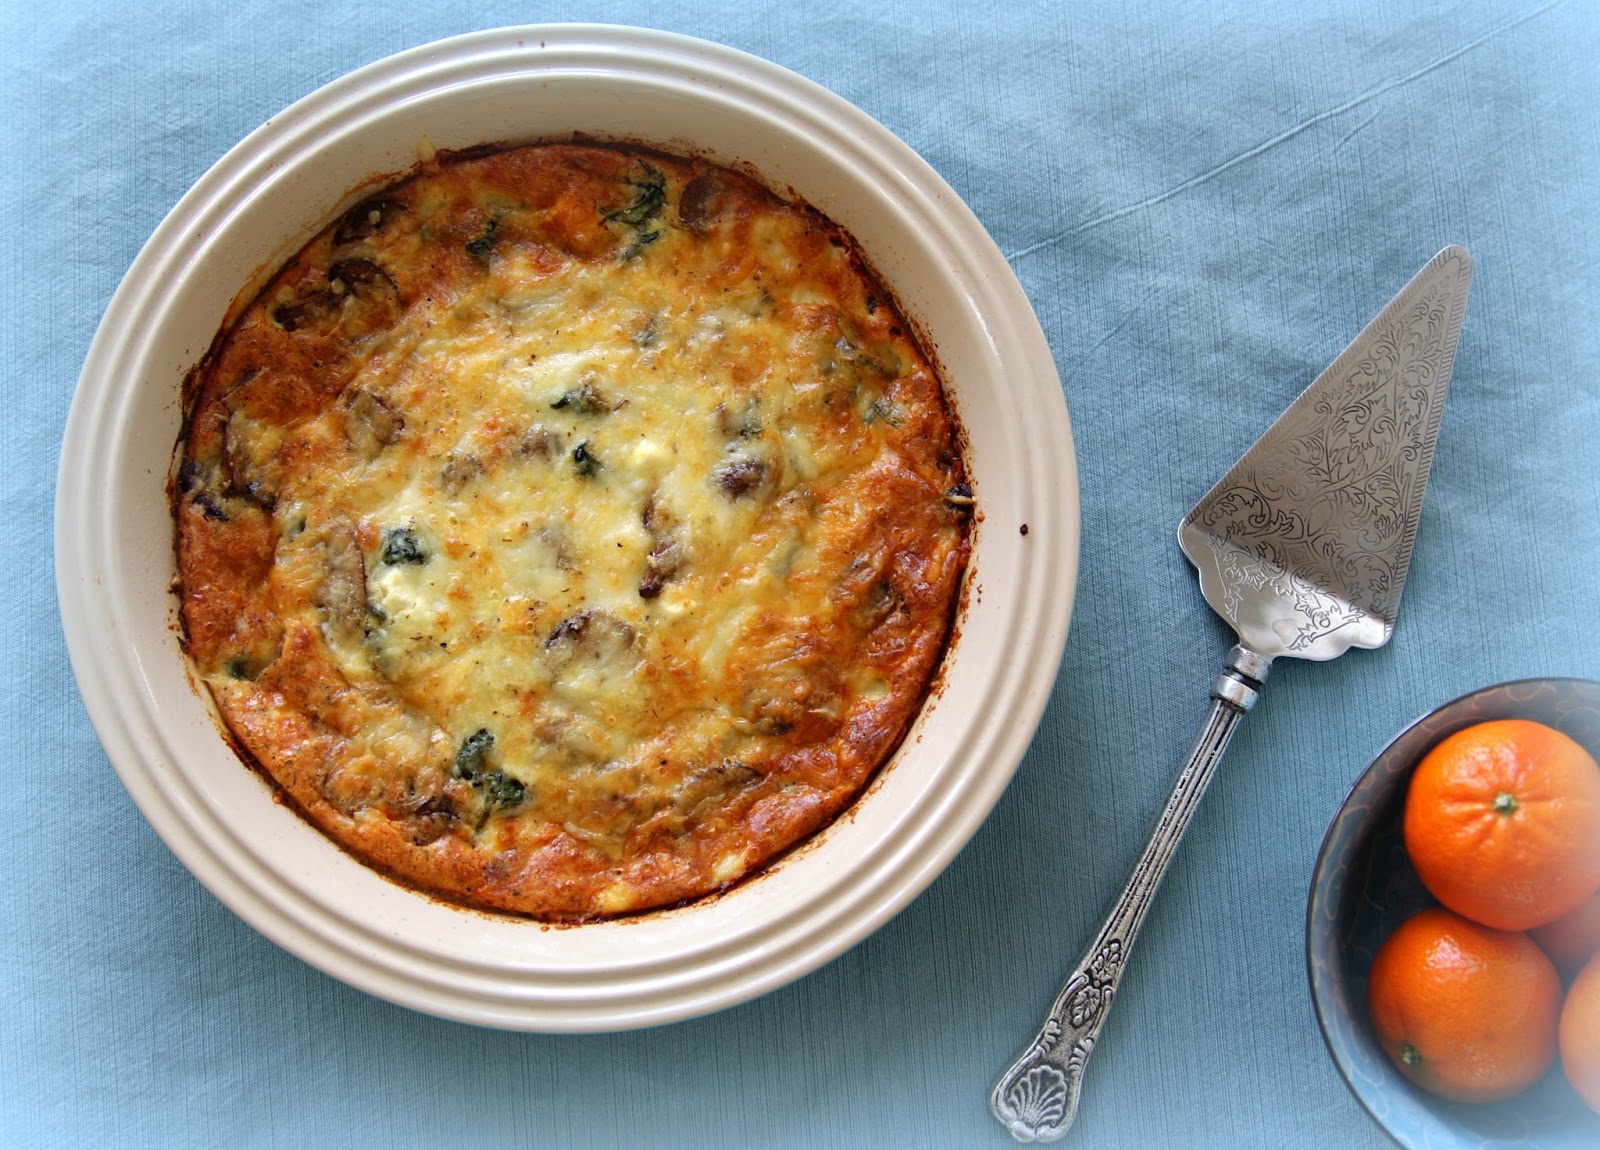
How to Make a Quiche and Create Your Own Recipe

Print Friendly Version of this pagePrint Get a PDF version of this webpagePDF
In a little college town in norther Idaho sits the best coffee house I have ever been to.  It's more than a coffee shop.  It's a study hall.  It's a pub.  And it has some of the best food I've ever enjoyed.  When I'm there, I get coffee and something for breakfast each day of my stay.  Sometimes I choose a cinnamon roll, which are always fresh, made from scratch and are only available to those who get there early.  More often I'll get a piece of crustless quiche.

Funny thing, I was never one to eat quiche.  I like eggs and will always have cheese when offered, but never cared much for quiche.  That changed when I ate a piece of the crustless veggie quiche that Bucer's offers.  It was so creamy and had the perfect ratio of eggs to cheese to vegetables.  And I'm certain that the absence of a crust was really a plus for selling me on quiche.


Since that first piece, I've ordered quiche over cinnamon rolls many times at Bucer's Coffehouse Pub.  I have also tried to recreate the quiche.  What I've learned along the way is how to build a quiche.  One of the best quiche recipes I made myself during this endeavor is a recipe for a spinach and feta quiche.

Rather than give you another quiche recipe {you could just go to the one I've mentioned above; it's quite good} I plan to help you learn to build your own quiche.  The beauty of not following a specific recipe is you can use what you have on hand.

I've found making quiche an excellent opportunity to use up cheese that I have remaining from entertaining.  And I am able to use up some of the bulk fresh ingredients that I get at Costo.  Have you ever bought a bag of fresh baby spinach or a container of mushrooms just to throw out half of them?  You could easily use them in a quiche of your own design.

Don't limit yourself to leftovers though, design a special quiche for an upcoming occasion.  They are wonderful for breakfast, brunch and even dinner.  You can make the day of your event as they come together quickly.  Just allow time for baking and to cool some.  Or, make the quiche a day ahead.  Remove from the refrigerator about an hour before serving to come to room temperature or reheat in the oven to serve warm.

Basics of Making a Quiche


Milk and Eggs~ 4 Eggs to 1 Cup Milk
The basics of every quiche is eggs and milk.  Keep this in mind while designing your quiche.  I like to do 4 eggs and 1 cup of half n half.  Have fun and try out different types of milk~ whole milk, half n half, cream or buttermilk are options.

When you are mixing the eggs and milk, you can use up to 6 eggs for a standard quiche.  Just increase the milk.  I suggest 4 eggs to 1 cup of milk, 5 eggs to 1.5 cups, and 6 eggs to 2 cups.

Cheese~ 2 Cups of Grated or Crumbled
Not a requirement of a quiche, but cheese is a wonderful addition.  With so many cheeses, quiche possibilities are limitless.  As a cheese lover, I use 2 cups of cheese.  Use any combination to add up to two cups.  In the quiche recipe I give below, I used four different cheeses.  Mostly I had many smaller amounts of cheese to use up.  You can also use a single type of cheese.  It's your quiche!  Any cheese that can be grated or crumbled works.  I would recommend that if you use a cheese with a strong flavor, use about 1/4 cup of it and then complete the 2 cups of cheese with a milder one.  Although, I really like strong flavors so I change that ratio sometimes.


Some tasty cheese combinations I've enjoyed:
Gruyere and Havarti
Cheddar and Blue Cheese
Feta and Gouda

Fillings~ 1~2 Cups or 1~2 Handsful
Meats and/or vegetables can be added to your quiche.  Meats are rather easy.  Make certain they are completely cooked and chopped.  Vegetables will need a bit more work as they are usually full of water.  Sauteing and patting vegetables dry will help remove excess moisture so that they work well in your quiche.  Tomatoes do well if you sprinkle them with a bit of salt, let sit then pat dry.

Classic fillings are ham or bacon, spinach, mushrooms and onions.  Try what you like though.  Have fun with it.  Don't forget to use some complimentary herbs and spices such as thmye, dill, garlic and pepper.  I do not recommend using salt as cheese usually is quite salty on its own.


Putting it all together.
Why no crust?  It adds time.  And calories.  Calories?  What about all that cheese and cream?!  Exactly.  I'd rather splurge on the cheese than the crust, but that is my personal preference.  Really, the crust takes more time when making a quiche.  Without the crust you have: 1. quicker prep time, 2.  less calories to indulge in the cheese, 3.  no gluten and low carb!  I see it as a win~win~win.

I recommend a pie dish especially since you have no crust.  The pie dish will hold all the ingredients together while it cooks.  When I made my first quiche, which was a crustless recipe, the directions were to use a spring-form pan.  Messy mistake.  There was nothing to hold the eggs and cream in the pan and it oozed out.  Big waste of ingredients.

Grease a pie dish, either standard or deep dish depending on the amount of eggs and milk you use.  Fill the bottom of the pie dish with the meats and/or vegetables.  Next, layer on the cheeses.  You could save some grated cheese for the very top.  Combine your milk and eggs with any seasonings you'll be using.  Use of a hand mixer will help blend the eggs well.  Pour the egg mixture over the cheese and other filling.  If you saved some cheese to top, scatter that on.  Bake in a 350F preheated oven for 45~60 minutes.  Again, it depends on the amount of eggs and milk you used.  If you use fewer ingredients, less cooking time and vice versa.  You want your quiche to be golden but not too solid.  You are aiming for a custard filling.

If you aren't quite ready to build your own quiche recipe, you can start with this one.  I used a combination of four cheeses which were the excess from a cheese plate at a recent brunch.  Some fresh spinach and mushrooms were used for filling and half n half rounded out my choices for this quiche.


Crustless Four Cheese Quiche
1-2 tbsp olive oil
8-10 oz fresh baby spinach
4 oz baby bella mushrooms, sliced
1/2 tsp salt
1/2 c crumbled feta
1/2  c shredded gruyere
4 eggs
1 c half n half
1/4 c grated parmesan
1/2 tsp dried thyme
1/2 tsp ground pepper
1/2 c shredded fontina

Preheat oven to 350F.  Grease a standard pie dish.
Place 1 tbsp olive oil in large skillet; heat over medium-high heat.  Add spinach and toss occasionally to wilt.  Once wilted, remove to paper towels.  Add remaining oil and mushrooms to skillet; sprinkle with 1/2 teaspoon of salt.  Saute for 5 minutes.

Squeeze excess moisture from spinach.  Scatter the spinach in bottom of prepared pie dish.  Top with mushrooms then feta and gruyere cheeses.  In large bowl, combine eggs, half n half, parmesan, thyme and pepper; blend well to combine {alternately, use a blender for this step}.  Pour egg mixture over ingredients in pie dish.  Top with grated fontina.  Bake in preheated oven for 45 minutes or until golden.  Let cool for 10 minutes before serving.


Brunswick Stew ~ A Family Favorite Recipe

Print Friendly Version of this pagePrint Get a PDF version of this webpagePDF

Of the dishes you make how many are family recipes?  I often think that favorite recipes are always the handed down ones written on old index cards.  As I looked at my family's favorite dishes that I make over and over, I realized most of them are new to us.  There are really no recipes that I make that are from my mom or grandmother.  Most likely because my mom was not a cook; she was a secretary who made meals for five children and her own mother after she came home from a long day on her feet.  Dinner was usually something inexpensive, simple, and quick, like dried out hamburgers.  No cheese, that would have been too costly.  Don't get me wrong.  I have an immense awe for what my mom did for us and now realize how difficult it is to cook a pleasant meal for a whole family, every night!

I do see the influence of my mother's cooking on the recipes I love.  They are directly inspired by dishes my mom made when I was a child.  Brunswick stew was a staple in her kitchen.  If you aren't familiar with this stew, it is like a thick vegetable soup with meat. She made a typical Virginian Brunswick stew with lots of chicken and lima beans.  Sadly, when I was served this for dinner, I would hide it in my drink cup underneath a crumpled up paper napkin.

My children have clear drink glasses that I can easily see the contents of so no hiding unwanted food for them.  Though there is no need in the case of Brunswick stew; they aren't as hostile to this southern classic as their live in cook.  Sure, the tomato soup appearance and the quantity of vegetables may strike them and make them a bit hesitant at first glance.  But every time {no exaggeration}, every time~ they finish their bowls by the sway of their own taste buds.


The difference? The addition of barbecue sauce and some ground pork.  I learned this from a restaurant.  A tremendous flavor, sweet and smokey, is added with the barbecue sauce. And the ground pork just gives a contrasting texture to the smooth vegetables and stew.  My six~year~old commented how he "really does not like lima beans except in this stew."

Throughout the fall and winter this stew reappears at the dinner table {and sometimes if lunch when there is rarely enough left}.  Sometimes I start from scratch with my own roasted chicken. Or I plan to use leftovers like Christmas turkey.  And southern style green beans, the ones I simmer with bacon for hours are great in this stew.  Just gather between 6~8 cups of vegetable {green beans, corn, potatoes, and tomatoes are all good choices} and about 4 cups of shredded or chopped poultry {turkey, chicken or even pork work} and you have the foundation of a great dinner.  Your family won't even know that you are using up leftovers!  Don't forget corn muffins or bread.  Can you say mmmmmm?


Family Favorite Brunswick Stew
1 lb ground meat {recommend ground pork}
1 lb poultry {about 3 chicken breasts or 4 c meat}, cooked and chopped or shredded
1 lb frozen lima beans
1 lb frozen corn kernals
1 tbsp olive oil
1 large onion, chopped
1 green bell pepper, chopped
2 28 oz cans crushed tomatoes
1.5 cup bbq sauce {recommend Sweet Baby Rays}
salt, pepper, thyme to season
chicken broth, as needed
shredded cheddar to garnish as desired

Directions
Brown ground pork in skillet; drain fat and set aside.  Heat olive oil in stew pot or dutch oven.  Saute onion and bell pepper.  Add browned meat, shredded poultry, and crushed tomatoes.  Season with salt, pepper and thyme.  Heat to simmer.  Add frozen {or leftover} vegetables; as they heat, the frozen veggies will thaw and thin the stew a bit.  After it has all simmered, add chicken broth if you want a thinner stew.   Continue to simmer for 45 minutes to an hour to allow flavors to blend and stew to thoroughly heat.  Alternately, after meat is browned and the veggies sauted, add all ingredients to a crock pot and heat on low setting for 5~8 hours.


My Favorite Spinach Dip

Print Friendly Version of this pagePrint Get a PDF version of this webpagePDF


Necessity is the mother of invention. It's true in so many ways, and cooking is by far not the exception. There are many recipes for spinach dip out there, but I am positive you haven't used this one. This recipe was born from necessity.

A few summers ago on our beach vacation I needed to use up some groceries. Many of the items were bulk quantities~ fresh spinach, shredded cheese, and feta cheese. I was soooo happy we encountered this problem. I decided to make a spinach dip using the remainder of the feta cheese. Feta has since become the key ingredient to our spinach dip. It adds a salty tang and a richness to the dip that other ingredients just cannot match.

I've tried lots of recipes for spinach dip, too. I don't add mayonnaise; it separates and makes the dip too greasy. I do not like to use Alfredo sauce {which some recipes call for claiming it tastes like restaurant spinach dip; Not.}. The only thing I may add that is not listed in this recipe is artichokes or canned green chilies. Even though there are quantities for the ingredients, this recipe is quite forgiving. Just go with what you have. Don't have shredded mozzarella? Use shredded cheddar. Have more feta? Decrease the amount of cream cheese. You really cannot go wrong. Just don't leave out the feta. It is key.

My Favorite Spinach Dip
12 oz cream cheese {1 1/2 blocks}, softened
1 c feta cheese
1/2 c shredded Parmesan
1/2 c shredded mozzarella
1 lb fresh baby spinach, wilted and chopped

Blend cheeses together well. Stir in chopped spinach. Spread in a shallow baking dish {recommend size approximately 9"x9"}. Bake in 375F oven for 25~30 minutes until golden and bubbly. Serve with chips or toasted bread slices. OR especially for hot days of summer, place all ingredients in crockpot and heat on high, stirring occasionally. {This is actually my preferred cooking method~ it is easy and the texture is great.}


Some cooking tips for fresh spinach~

Use a deep frying pan and pile all the spinach inside. Cook over medium heat, using tongs to turn spinach over as it cooks.


Use a spatula to chop up the spinach as you cook it. No need to dirty other dishes such as a cutting board or food processor. Also, while you're cooking it, spread the spinach out to cover the entire surface of the frying pan so as much of the water evaporates as possible {no need to drain the spinach}.


Cheesy Garlic Rolls and BMT Salad~ Friday Night Dinner

Print Friendly Version of this pagePrint Get a PDF version of this webpagePDF

Friday night, there's one every week.  In our house, we like to take it easy but also have some fun.  Most often we watch a movie and eat dinner while we watch.  Dinner is often something that isn't difficult to make or is made ahead of time.  One more thing, dinner has to be yummy.

I know many families opt for pizza on Friday nights.  Nothing wrong with that in my opinion.  Pizza happens to be one of our favorite Friday night dinners, but something different can be good and just as delicious.  Cheesy garlic rolls are similar to pizza~ based on pizza or bread stick dough and loaded with cheese, my children L~O~V~E these.  They don't miss the tomato sauce.  In fact, these have their favorite parts of pizza, lots of gooey cheese with a buttery crust.


But we can't have just cheesy garlic rolls for dinner, now can we?  Well, my kids think they can.  Here's a salad that is so flavorful and a nice twist~ BMT Salad.  I had this at a covered dish once, got the recipe, and now make it a few times a year ever since.  The salad makes enough for quite a large group so you may want to half it.  It is a hearty salad with bread and fresh mozzarella and bacon.  The balsamic vinegar and the basil add a distinctly sweet flavor to the whole salad.

Basil Mozzarella and Tomato Salad
1/2 lb. fresh mozzarella, cubed
1/3 c olive oil
1/3 c balsamic vinegar
1 small baguette, cubed
4 plum tomatoes, cut into wedges
4-6 leaves fresh basil, chopped
2 hearts of romaine lettuce, rinsed and chopped
3 green onions, sliced
1/2 lb bacon slices, cooked and crumbled

Preheat oven to 400F.
Combine mozzarella, olive oil and balsamic vinegar in a small bowl; cover and let marinate in refrigerator at least an hour.  Place bread cubes on cookie sheet; toast in preheated oven for about 5-8 minutes, tossing once or twice.

Place toasted bread in large bowl; add tomatoes, basil and marinated mozzarella.  Toss and let sit at least 15 minutes. Place lettuce in serving bowl.  Top with bread mixture, green onions and crumbled bacon.  Toss lightly. Serves 10~12.


Cheesy Garlic Rolls
1 1/2 c warm water
1 tbsp sugar
1 tbsp yeast
1 tsp
4-5 c flour
drizzle of olive oil
1/3 c butter, very soft
6 tbsp grated Parmesan
1 tsp garlic powder
1/2 tsp dried basil
3 c shredded mozzarella

Mix sugar with the warm water; add yeast and stir.  Let sit in warm spot for 5 minutes until foamy.  Stir in salt.  Add 2 cups of flour and stir to combine.  Using dough hook {or hands}, add 1 cup flour at a time and stir/knead dough until it is not too sticky and forms a ball.  Flour your work surface and knead dough on surface for a couple of minutes, until smooth.  Place dough in a large glass or porceline bowl; drizzle with a bit of olive oil and toss to coat.  Cover bowl with plastic wrap and place in warm spot for 1 hour to rise, about doubled in size.

Preheat oven to 375F.  Grease a 9"x13" pan.
Punch risen dough down.  On floured surface, roll dough out to a bit larger than 9"x13".  Spread soft butter over entire surface of dough.  Combine Parmesan, garlic and basil.  Sprinkle over buttered dough.  Top with mozzarella.  Roll dough, like for cinnamon rolls, from the long side to the long side.  Cut into 12 equal pieces.  Place in greased 9"x13" pan.  Bake in preheated oven for 20~25 minutes or until golden and bubbly.  Serve warm.


Tips and Tricks~
*You can make these ahead of time, up to the point of baking.  Just keep covered and refrigerated, even overnight.  Let them stand at room temperature for 20 minutes before baking and you'll be good to go.
*The salad is easy to make ahead as long as you don't combine all the ingredients.  Keep the ingredients in separate baggies in one container to throw together just before serving.  That also means you don't want to have leftovers of this salad; it doesn't keep after combing everything.  Though, you probably won't have any leftovers.
*When chopping the fresh basil, layer the leaves and roll.  Then slice thinly, and chop the thin slices.


Pin It

Sopa Paraguaya~ Paraguayan Cornbread

Print Friendly Version of this pagePrint Get a PDF version of this webpagePDF
Cornbread may be a misleading name for this recipe.  What comes to my mind when I hear 'cornbread' is a very crumbly, often dry texture of food. The corn is simply a backup singer for the cheese and onions in the recipe.  Around our house we do not call this Paraguayan Cornbread; we call it Aunt Claudia's cheesy~onion~casserole.


My sister~in~law, Claudia, has an interesting heritage.  She is American by birth but her parents are from Argentina, and she was often cared for by a family friend {much like a nanny} who is from Paraguay.  So the food she makes has many influences and is always a hit with us.  Perhaps my favorite is this cheesy dish.

I really, really, really, like cheese and onions.  I will warn you, that if are not too fond of either, this is not the dish for you. It is loaded with two pounds of cheese and four onions.  If you do like cheese and onions, this may be the side dish of your dreams.  It makes an excellent side for roasted chicken {just put some chicken pieces in a baking dish and season with Adobe then roast}.

Paraguayan Cornbread
4 medium sweet onions, sliced
3 tbsp olive oil
1 c fine white corn meal
1 tsp baking powder
1/2 tsp salt
1/2 c unsalted butter, softened
1 15 oz can corn
1 c whole milk
3 eggs
1/2 lb Muenster cheese
1 lb Monterrey ~Jack cheese

Preheat oven to 350F.
Saute onions in olive oil until tender and slightly browned.  While onions are cooking, cube cheeses.  Combine baking powder, corn meal and salt.  Place softened butter, creamed corn and corn meal mixture in bowl; combine well.  Slowly add milk and eggs and mix well.

Add cooked onions to corn mixture and then add cheese.  Spoon into a greased 9x13" casserole dish.  Bake in preheated oven for 35~45 minutes, until golden on top.  Let cool for 10~15 minutes before serving {it needs to set or it will be to soft to hold any shape}.


Tips and Tricks~
*The cornbread should be served warm, not hot.  If you cut into while it's hot, you'll need a spoon to eat it with and the rest of the casserole will ooze in and take over the empty space from the missing piece.
*If you buy white corn meal in the regular grocery {instead of an international market} you may only find self~rising corn meal.  If so, you can use it; just skip the baking powder and salt in this recipe.
*The casserole is even tastier after it has been refrigerated for a day and reheated.  I don't really know why, but it is.  It can be reheated in the oven {covered}.


Pin It

Shrimp Etouffee

Print Friendly Version of this pagePrint Get a PDF version of this webpagePDF


Etouffee is a bit different from jambalaya {not tomato based} or gumbo {thicker} but very Creole. It features shellfish, usually crawfish or shrimp; I prefer shrimp, mostly because I can easily buy it already deveined and shelled, though if you do shell your shrimp, you can use it to make a shrimp stock to cook your rice in {I just use chicken broth}.

Etouffee means to smother, which is a Cajun cooking technique of simmering a small amount of liquid to make a gravy that is heavily seasoned then served over rice {rice should be simple, cook with stock or broth and season with salt and pepper once cooked, maybe a tad bit of butter so it isn't too sticky}; it is quite popular in Louisiana, especially New Orleans.

Great dish to have for Mardi Gras {which is February 21 in 2012}. Most equate Mardi Gras with riotous parties but it is actually a day that is meant to prepare for the season of Lent.  It is French for Fat Tuesday, referring to the eating of rich food before fasting begins on Ash Wednesday.


Shrimp Etouffee
1 c butter
1 c flour
2 bell peppers
1 medium onion
2 c chopped celery
5 c broth
1/3 c fresh chopped parsley
1 tsp salt
1 tsp pepper
1/2 tsp cayenne pepper
1/2 tsp paprika
1/2 tsp garlic
1 lb shrimp {small, salad shrimp}

Melt butter in a deep sauce pan or dutch oven over low heat.  Whisk in flour and continue to cook over low heat, whisking frequently, for 20 minutes.  While roux {flour and butter} is cooking, chop the onion, celery and bell peppers.

Add veggies to to roux and stir, coating the veggies.  Increase heat to medium~high.  Slowly add the chicken broth, stirring while doing so.  Season with salt, pepper, cayenne, paprika and garlic.  Stir.  Once the sauce has come to a boil, lower heat to maintain a simmer.  Cover and simmer for 30 minutes.  Stir in cooked shrimp and cook to heated through.  Serve over hot rice.

Tips and Tricks~
*The base of the recipe is a roux that takes time to make. It is important to cook the flour and butter over a low heat so it doesn't burn but should cook for about 20 minutes, til it deepens in color to a mellow caramel.
*The roux doesn't deepen too much in color, but after all the other ingredients have been added and it simmers for 30 minutes, it will get a bit darker.
*Don't be alarmed at the thin soup when you first add all of the broth.  After simmering, covered, the sauce will thicken quite a bit.
*If you use frozen, precooked shrimp, make certain it is completely thawed and drained.  If not, your etouffee will more soupy.


Pin It