Showing posts with label Pork. Show all posts

Brunswick Stew ~ A Family Favorite Recipe

Print Friendly Version of this pagePrint Get a PDF version of this webpagePDF

Of the dishes you make how many are family recipes?  I often think that favorite recipes are always the handed down ones written on old index cards.  As I looked at my family's favorite dishes that I make over and over, I realized most of them are new to us.  There are really no recipes that I make that are from my mom or grandmother.  Most likely because my mom was not a cook; she was a secretary who made meals for five children and her own mother after she came home from a long day on her feet.  Dinner was usually something inexpensive, simple, and quick, like dried out hamburgers.  No cheese, that would have been too costly.  Don't get me wrong.  I have an immense awe for what my mom did for us and now realize how difficult it is to cook a pleasant meal for a whole family, every night!

I do see the influence of my mother's cooking on the recipes I love.  They are directly inspired by dishes my mom made when I was a child.  Brunswick stew was a staple in her kitchen.  If you aren't familiar with this stew, it is like a thick vegetable soup with meat. She made a typical Virginian Brunswick stew with lots of chicken and lima beans.  Sadly, when I was served this for dinner, I would hide it in my drink cup underneath a crumpled up paper napkin.

My children have clear drink glasses that I can easily see the contents of so no hiding unwanted food for them.  Though there is no need in the case of Brunswick stew; they aren't as hostile to this southern classic as their live in cook.  Sure, the tomato soup appearance and the quantity of vegetables may strike them and make them a bit hesitant at first glance.  But every time {no exaggeration}, every time~ they finish their bowls by the sway of their own taste buds.


The difference? The addition of barbecue sauce and some ground pork.  I learned this from a restaurant.  A tremendous flavor, sweet and smokey, is added with the barbecue sauce. And the ground pork just gives a contrasting texture to the smooth vegetables and stew.  My six~year~old commented how he "really does not like lima beans except in this stew."

Throughout the fall and winter this stew reappears at the dinner table {and sometimes if lunch when there is rarely enough left}.  Sometimes I start from scratch with my own roasted chicken. Or I plan to use leftovers like Christmas turkey.  And southern style green beans, the ones I simmer with bacon for hours are great in this stew.  Just gather between 6~8 cups of vegetable {green beans, corn, potatoes, and tomatoes are all good choices} and about 4 cups of shredded or chopped poultry {turkey, chicken or even pork work} and you have the foundation of a great dinner.  Your family won't even know that you are using up leftovers!  Don't forget corn muffins or bread.  Can you say mmmmmm?


Family Favorite Brunswick Stew
1 lb ground meat {recommend ground pork}
1 lb poultry {about 3 chicken breasts or 4 c meat}, cooked and chopped or shredded
1 lb frozen lima beans
1 lb frozen corn kernals
1 tbsp olive oil
1 large onion, chopped
1 green bell pepper, chopped
2 28 oz cans crushed tomatoes
1.5 cup bbq sauce {recommend Sweet Baby Rays}
salt, pepper, thyme to season
chicken broth, as needed
shredded cheddar to garnish as desired

Directions
Brown ground pork in skillet; drain fat and set aside.  Heat olive oil in stew pot or dutch oven.  Saute onion and bell pepper.  Add browned meat, shredded poultry, and crushed tomatoes.  Season with salt, pepper and thyme.  Heat to simmer.  Add frozen {or leftover} vegetables; as they heat, the frozen veggies will thaw and thin the stew a bit.  After it has all simmered, add chicken broth if you want a thinner stew.   Continue to simmer for 45 minutes to an hour to allow flavors to blend and stew to thoroughly heat.  Alternately, after meat is browned and the veggies sauted, add all ingredients to a crock pot and heat on low setting for 5~8 hours.


Sweet Italian Sausage and Pasta

Print Friendly Version of this pagePrint Get a PDF version of this webpagePDF

Frequently I will buy a large pack of sweet Italian sausage links knowing that they are easy to prepare for dinner.  Sadly, I often prepare the sausages the same way, always with some type of tomato sauce~ simmered in marinara sauce with peppers and onions, served over spaghetti with tomato sauce, sliced and cooked on pizza with tomato sauce.  There's a definite patter of sausage and tomato sauce.

With the a pound of sausage links to use and my apathy of late with tomato sauce, I tried something different.  Not too creamy and not cheese based like Alfredo {cheese sauce with sausage just sounded like it would drop straight to the bottom of my gut}, I made a thin sauce with chicken broth which was a perfect compliment.

Once the sausage has cooked, it is sliced then browned with onions.  This tends to leave lots of seasoned bits stuck to the pan.  But those bits come off easily when a sauce is made in the same pan, and they help flavor the sauce.  The flavor is not intense, like a tomato sauce can be, but it the mildness with the pasta and sausage makes quite a delicious dish.  Actually, it is one that we have not had leftovers of because it is so well liked.


Sweet Italian Sausage Pasta
1 lb sweet Italian sausage links {about 6 links}
1 small sweet onion, chopped
1/4 cup butter
1/3 c flour
3 c chicken broth
1 1b box short pasta {such as cut fusilli, penne or even egg noodles}
fresh parsley, chopped {for garnishing}
fresh ground salt and pepper, to taste

Place sausage in skillet and add water to reach half way up sausage. Heat to simmer and cook til water is evaporated; turn sausages over and add water to half way up sausages again. Simmer til water is evaporated again. Remove sausages and slice into circles. Return sausages to frying pan and add chopped onion; cook over medium~high heat til sausage is browned and onions are tender. While sausages are browning, begin pasta and cook according to package directions.

Reduce heat to medium and add butter to skillet; melt and stir, scraping up bits of sausage stuck to pan. Sprinkle sausage and onion with flour; stir. Slowly stir in chicken broth, scraping skillet. As you add the broth, you will find the bits scrape easily off the skillet. These bits season the sauce nicely. Once sauce begins to simmer, continue to simmer for 5 minutes to slightly thicken sauce. Remove from heat and keep covered.

Drain pasta. Add sausage and sauce; combine. Garnish with fresh chopped parsley.

Tips and Tricks~
*Prepare sausage ahead of time up to the browning point. Slice and refrigerate or freeze. When you want to make this dish, pick back up at the browning point. I love preparing ingredients ahead of time. The grocery stores have caught on to that; they sell all types of prepared ingredients in nice packages.
* Use a metal skillet, not a non~stick one. The sausages will wreak havoc on non~stick pans and the metal pan will easily clean up, especially after scraping the bits off while adding the broth.
*This dish is excellent with a side of roasted Brussels sprouts. Place sprouts on a cookie sheet and toss with olive oil and coarse salt. Roast for 20 minutes in a 400F oven.


Pin It

Make Ahead Spinach Souffle

Print Friendly Version of this pagePrint Get a PDF version of this webpagePDF

For our third anniversary my husband took me to a bed and breakfast in Chincoteague, VA.  The Inn at Poplar Corner is a beautiful replica of a Victorian home in the outer banks of the Virginia shore.  It is a charming place that we fell in love with and revisited for years {only ending when we decided to take family beach vacations around our anniversary and enjoy a night out instead of a week}.  We enjoyed biking through the seashore park to the beach, often spying the wild ponies grazing in the marshes.  We also enjoyed a home cooked breakfast each morning which we often took on the wrap around porch.  It was quite romantic.

The owners of the home each night would make breakfast for the following morning.  They made enticing meals that would feed all of the couples staying at the inn, and they did it effortlessly.  Even though it was our anniversary time, we would sit and talk to the owners some nights when we came in.  Sometimes we even sat and played cards with them.  I was even shown some of the ways they prepared food with such ease.  They would include a savory dish and something sweet along with fresh breads or muffins.  One of the dishes that I learned from Joann, one of the owners {I believed they have sold the inn now}, was Spinach Souffle.


On one of our last visits there my husband purchased their cookbook for me, Recipes From the Watson House {named for the original Victorian home across the street}.  I enjoy making many of the recipes I find in it, but the Spinach Souffle is my favorite and is always a tasty reminder of the days I spent there with my husband.

Make Ahead Spinach Souffle
1 box seasoned stuffing mix {about 2 1/2 c}
1 lb ground sausage
4 eggs
2 c milk
1 10 oz can cream of mushroom soup
1 10 oz pkg frozen chopped spinach, thawed
1 4 oz can sliced mushrooms, drained
1 c shredded cheddar cheese
1 c shredded Monterey Jack cheese

Grease a 9x13 inch baking dish.  Crumble and brown sausage in frying pan.  Drain; spread over top of croutons in baking dish.  Combine eggs and milk; mix well.  Add cream of mushroom soup, spinach, mushrooms and cheeses to egg mixture.  Stir well and pour over top of sausage and croutons.  Cover and refrigerate overnight.

Remove souffle from refrigerator.  Place in cold oven; heat to 350F.  Once oven is heated, bake souffle for 50-55 minutes, until lightly browned and bubbly.


Tips and Tricks~
*This is a make ahead dish that allows you to just wake up and pop it in the oven, making it great for company and holidays.  It doesn't work well to make then stick in the oven because the egg mixture needs to mingle with the croutons.
*The recipe is easy, making use of canned and prepackaged items.  With not much trouble, you could use fresh spinach {wilt it quickly in a frying pan} and fresh mushrooms.  I do this and it makes the recipe even better.
*Switch up the cheeses.  Use Parmesan or white cheddar or pepper jack.
*Keeping with the Inn's selection of serving both savor and sweet dishes for breakfast, this goes great with a berries baked with an oatmeal topping.

Pin It

Sausage Gravy

Print Friendly Version of this pagePrint Get a PDF version of this webpagePDF

As a child I spent many days in the country kitchen of my grandmother in Southern Virginia. Way down south in a place called Hillsville. It was a bit embarrassing to come back home, not only with a slight southern drawl I picked up, but having to tell my friends the name of the place I had been. But it was a rich experience, so different from the city life of Northern Virginia.

The best part about these visits was the table, or the food on the table. From sunup to sundown the table was filled with food that was made by the hands of my grandmother. She could not speak clearly so I would just nod my head as she tried to explain something to me. But my Aunt Lou could understand everything she said and sometimes would take a moment to explain to me. By far the best food of the day was that from breakfast. And the best part of breakfast was homemade biscuits and sausage gravy.

My aunt took the time to explain how to make biscuits and gravy, both without a recipe. The biscuits I have never mastered {I substitute these easy biscuit muffins that requires no rolling and cutting}. The gravy I have. It is easy. You will notice that I have listed a recipe but there really isn't a set amount of measurements to follow when you do this from memory. It is more of how the ingredients come together~ browning sausage, covering with flour then mixing with milk and adding more milk for the right consistency.

How to eat biscuits and gravy~


First crumble the biscuit so the gravy clothes it all.


Then top the crumbled biscuit with gravy. Dig in! 

Sausage Gravy 
1 lb sausage gravy {recommend sage}
1/2 c flour
2 cups milk, plus more for thinning gravy pepper to taste

Place sausage in a skillet and heat over medium~high. Use a wooden spoon to cut up sausage and stir as it cooks. Once sausage has cooked through, turn heat to high and brown, stirring frequently. Lower heat to medium~low. DO NOT DRAIN SAUSAGE. Sprinkle flour over sausage and stir to coat all pieces with flour. Add 2 cups of milk and stir with wooden spoon; continue to stir frequently as gravy heats to simmer. As it heats, the gravy thickens and you may want to add more flour to thin some. Add pepper and serve hot over biscuits.


Pin It

Savory and Sweet Corn Bread Stuffing

Print Friendly Version of this pagePrint Get a PDF version of this webpagePDF


Stuffing or dressing? Inside or out? As a child, I had never had stuffing. My mother always made dressing. Even when she made Stove Top Stuffing she called it dressing. Do you know the difference? As the name implies, stuffing is used to stuff meat, usually a whole bird for roasting. Dressing is synonymous with stuffing but is more often to refer to the method of cooking outside of the bird. Also, depending on the geographic location; stuffing is more often used in the the South and East. I prefer dressing to stuffing mostly because it is what I am used to eating and saying, though my favorite recipe is for a stuffing.

Here is my favorite stuffing recipe. It is sweet due to using sweet corn muffins and it is savory with bits of sausage and mushrooms. My children even like this {as long as I remember to chop up the mushrooms and resist the temptation to leave them in slices}. It could even be a meal on its own. The recipe is based on one from a cookbook my mother gave me many years ago. Using fresh corn muffins makes it especially moist. I have never used it to stuff a turkey, but I am certain it would be just as delicious if it was cooked inside your turkey as it is in a pretty casserole dish.

Savory and Sweet Corn Bread Stuffing
8 oz sliced mushrooms
1 c chopped celery
3/4 c chopped onion
1/2 c butter
1 1/2 c hot broth {chicken is best}
1 lb pork sausage, browned and drained
1 8x8 pan sweet corn bread, crumbled

Melt butter in large skillet; add mushrooms, celery and onion and cook until onions are tender. Place sausage in large bowl; add cooked mushroom mixture and crumbled corn muffins. Add hot broth {if using bouillon cubes, boil water and add the cubes and allow to sit for 5-10 minutes before adding to sausage and corn muffins}. Stir to combine all ingredients. Place stuffing in 2 qt. baking dish. Bake uncovered in 350F oven for 30 minutes or until hot.

A Note~
I often use sweet corn muffins from Costco {which are much larger than regular muffins}; I'll use 4 of those which may be equal to about 6-8 regular.


Pretzel Bites with Canadian Bacon and Cheese

Print Friendly Version of this pagePrint Get a PDF version of this webpagePDF
Many have seen and made the popular pizza bites (we call them blobs) but I wanted something slightly different. I happened upon pretzel bites, very similar but made with pretzel dough. I found this recipe and decided to swap the ham for uncured Canadian bacon which contains less sodium and fat and fewer calories than an equivalent serving of ham.

Canadian bacon as I am using the term is a lean cut of pork loin from the back of the pig. Outside of the US Canadian bacon is slightly different, being cured in sweet pickle with a crust of cornmeal. That is not this. It's also not bacon. As stated, it's lean.


I also found it easier to use cubes of cheese rather than shredded cheese as originally called for. This makes it easier to assemble and seal the dough around the filling. I also chose to leave out the extra salt topping. The pretzel cooking method of boiling the dough in water with baking soda as well as brushing the top of the finished dough supplies enough saltiness for my taste, even in my 6 month pregnant condition.

These were salty goodness in a small bundle. Trust me.


Pretzel Bites with Canadian Bacon and Cheese

based on recipe from Pennies on a Platter
Ingredients
2 1/2 tsp active yeast
2 Tbsp plus 1 tsp brown sugar, divided
1/4 c warm water
1 c warm milk
3 c flour
6-8 pieces Canadian bacon, cut into bite size pieces
1/2 lb Monterey jack cheese, cubed (about 32 cubes)
6 c water
4 tsp baking soda
4 tbsp butter, melted

Directions
1. Combine the yeast, 1 teaspoon brown sugar, and warm water in a bowl. Set aside until foamy. Combine remaining 2 tablespoons brown sugar and warm milk.
2. Add 2 cups flour and the milk mixture to the yeast mixture. Mix until blended well. Add the last cup of flour and mix dough in mixer with dough hook until soft dough forms.
3. Apply oil to the inside of a large bowl. Place dough in bowl and turn dough to coat with oil. Cover and allow to rise in a warm, draft free spot for about 2 hours, until dough has doubled in size and bubbles appear on the surface.
4. Divide into 4 equal pieces. Working on a floured surface, roll a piece of dough into a square. Divide into 8 smaller squares. Using a fourth of the bacon and cheese, top each square. Fold dough over filling and press to seal. Place seam down on a greased cookie sheet. Allow dough to rest for 30 minutes, uncovered.
5. Preheat oven to 400F. Place water in a pot and bring to a boil. Add baking soda. Lower heat to keep a gentle simmer in water. Add pretzel dough, working in small batches. Allow each batch to cook for 20 seconds, turning once while cooking. Place boiled dough on greased cookie sheet.
6. Baked pretzel bites in 400F oven for 10-15 minutes until browned. Brush with melted butter.

Breakfast Loaf

Print Friendly Version of this pagePrint Get a PDF version of this webpagePDF
Hearty. Delicious. Satisfying. Gooey. Terrific. Let's have it again!

That about sums up the comments for this breakfast.

The flavor of the sourdough enhanced by the ham and cheddar and chives was perfect for breakfast. Everyone seemed to like this one.


I served with sliced tomatoes instead of baking them inside of the loaf so my children wouldn't pick at their food!


Breakfast Loaf

adapted from allrecipes
6 eggs
dash of salt and pepper
bit of chives, about 2 stems
1 tablespoon butter
1 round sourdough loaf
1/2 pound sliced Virginia ham
3/4 cup shredded Monterey Jack cheese
3/4 cup shredded cheddar cheese
1 tomato,sliced

Directions~ Preheat oven to 350 F.
Preheat oven to 350 F.
Crack eggs into small bowl, add salt and pepper, then whisk.  Using a pair of scissors for speed and ease, snip chives into pieces. Combine with eggs.  Heat small skillet and melt butter. Lightly scramble eggs. Set aside.  Cut off the top 1/4 of the bread round. Using a knife, trim around the edge of the inside of the bread to make a bowl. Gently pull the excess bread out of the bowl. Use for another recipe.


Place half of the ham in the bottom of the bread bowl. Top with half of Jack cheese, half of cheddar cheese, and half of eggs. Add remaining ham and eggs then finish with cheeses.


Top with bread lid. Wrap the breakfast loaf in aluminum foil, tightly.


Cook in 350F oven for 25 minutes. Allow to cook for 10 minutes before slicing. Serve with sliced tomato.


*Update~ Sometimes it is difficult to find bread bowls the correct size for this.  You can make your own bread bowls using this recipe from King Arthur Flour.

Pin It

Mock Turtle Soup

Print Friendly Version of this pagePrint Get a PDF version of this webpagePDF

Then the Queen left off, quite out of breath, and said to Alice, `Have you seen the Mock Turtle yet?'
`No,' said Alice. `I don't even know what a Mock Turtle is.'
`It's the thing Mock Turtle Soup is made from,' said the Queen.
`I never saw one, or heard of one,' said Alice.
`Come on, then,' said the Queen, `and he shall tell you his history,'

From Alice's Adventures in Wonderland, Chapter 9


There may not be an animal that is a mock turtle, but there is a wonderful soup known as mock turtle soup.  Turtle soup was a delicacy in the past. But as the turtle population diminished, many sought something to replace the turtle meat in their favorite soup.  Most used various parts of calves since the texture was similar to turtle meat when cooked. Thus the calf head atop the turtle in the above illustration.

That may sound just a tad peculiar.  The version of Mock Turtle Soup you'll find below is in all actuality delicious.  Even my children adore it {of course having mini turtle rolls doesn't hinder their affections}.  This recipe uses beef, pork and chicken.  I have found that I truly prefer the combination of pork and chicken in this soup.  And the dash of lemon juice or a slice of lemon really adds the finishing taste.


If you are interested in making your own turtle rolls, here's what I did.  First I divided the dough into 5 pieces. Each piece was then divided into two equal pieces. The first piece {of the second division of dough} was shaped into a ball for the turtle's body, and the second piece was shaped into five pieces: a head and four legs. Using a sharp knife, I scored the body of the turtle in crisscross shapes and the legs with lines mimicking claws.  I pinched the outer edge of the head piece to form a little beak for the turtle's mouth.


Mock Turtle Soup

Recipe from literature guide for Alice in Wonderland sold by Veritas Press
Ingredients
1/2 c vegetable oil
3/4 lb beef, cubed
1/2 lb pork, cubed
1/2 lb chicken, cubed
2/3 c all-purpose flour
1 c chopped onion
1/2 c finely chopped green onions
1/2 c finely chopped parsley
2 tbsp finely chopped celery
1 tsp dried thyme
10 c beef broth, hot
1/2 c tomato sauce
hot sauce to taste
salt to taste
lemon slices

Heat the oil in a large, heavy pot over medium-high heat and brown all the meat. Remove the meat from the pot and set aside. Cook onions, green onions, parsley and celery in pan used to brown meat. Add more oil if needed to make about half cup in pan. Reduce heat to medium. Cook until onions are translucent.

Add flour to pan of onions. Stir. Slowly whisk in two cups of the hot stock and stir to form a thick paste, then stir in the tomato sauce. Stir in the remaining stock, then add the meats, salt and hot sauce. Reduce the heat to low, cover and simmer another hour.

Cool soup slightly and skim off any floating fat. Reheat before serving. Serve with a slice of lemon.

Advent Bread Wreath

Print Friendly Version of this pagePrint Get a PDF version of this webpagePDF


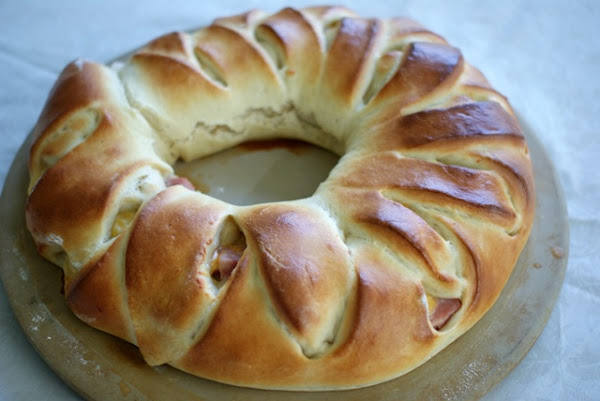
The season of Advent is here; let the celebrating begin! And what a great way to begin, with festive food. I thought it would be fitting to enjoy a bread ring for breakfast each Sunday of Advent.

How To Braid the Bread Wreath
My friend taught this technique to me and my daughter {the recipe is found at the end}. Basically it is a batch of bread dough (your favorite) rolled out and filled with filling ingredients.


Then each side of the bread is cut into strips and is braided.


As you fold ends over, the next piece should overlap the previous one.


When you get to the end, braid the last pieces, cut off the excess, and tuck in to shape.


To place the braided bread on the stone, work in small sections. First place one end on a round stone.


Then turn the stone a bit. Slide a hand under the next section of dough and lift onto stone.


Continue until the entire braid is on the stone. Then overlap the ends to complete.


Brush with an egg wash and bake in preheated oven for 25 minutes.


Ham and Cheese Bread Wreath
1 c of milk
1/3 c sugar
1 1/2 tbsp yeast
2 eggs, whisked
1/2 c butter, cut into pieces
4-6 c flour
1 lb ham, chopped
2 c shredded cheddar cheese
1 egg plus 2 tbsp water, combined for an egg wash

1. Mix milk and sugar in a small saucepan. Add pieces of butter. Heat to about 105 degrees F. If the milk is too hot, the yeast will die and your bread will not rise. If the milk is not warm enough, the yeast will not grow. If you don't have a thermometer, the milk should be like a very warm bath. Remove milk from heat; add yeast and let proof for about 5 minutes. If you do not notice the yeast rising and becoming foamy after 5-10 minutes, the yeast will not make the bread rise and you need to start over.

2. Place milk and yeast mixture in bowl of stand mixer; combine well. Add 2 cups of flour to the milk mix; mix well with the dough hook. Add eggs and stir well to combine. Continue adding more flour a cup at a time and stirring until the dough easily pulls away from the sides. I have used a wooden spoon and my own hands instead of the mixer as well. Place the dough on a well floured surface and knead for a few minutes til dough is smooth. Add flour to keep the dough from being too sticky while kneading. Place the dough in a large greased bowl. Cover with a towel and let sit in a warm place for about an hour til doubled in size.

At this point, to make the dough easier to use, refrigerate for at least an hour.

3. Preheat oven to 350F degrees. Flour your work surface and roll the dough into a long, narrow rectangle about 2 1/2 to 3 feet long by 8 inches wide. Scatter the ham down the middle of the dough and sprinkle with cheese. Cut slits down one of the long sides of the dough, counting as you do. Cut the same number of slits in the other side. Fold the slits of bread over the top of the ham and cheese. This forms your braid. Place braid on a baking stone, working in small sections to keep braid together. Brush with egg wash. Bake in preheated oven for 30~40 minutes.


Pin It

Ham and Pasta Tart

Print Friendly Version of this pagePrint Get a PDF version of this webpagePDF
Trying to spend less and feed a family of nine can be an almost impossible task. I try to fill our meals with inexpensive but filling dishes, and pasta is certainly that.

I came across this recipe in The Great American Brand Name Cookbook Collector's Edition. This is my favorite cookbook, not only because it was a gift to me from my mother, but because everything I have ever made from it has been declared tasty.

This dish was not an exception. It was tasty and pleasantly odoriferous. It was also a luscious feast for the eyes.


I modified the original recipe, Wisconsin Swiss Linguine Tart, to make it practical for what I had in the pantry and fridge as well as make it more of an all-in-one dish. I renamed it Ham and Pasta Tart. Basically I did not use linguine and added ham, and since I lacked fresh tomatoes I used diced canned tomatoes. I also omitted the salt since I was using ham, which is already salty for my taste. Following is the modified recipe.

Ham and Pasta Tart

Ingredients:
1/2 c. butter
, divided
1 tsp. minced garlic, more to taste
1 thin loaf of French bread, sliced in 1/4-1/2" pieces
3 tbsp. flour
fresh ground pepper, to taste
2 1/2 c. milk
1/4 c. grated Parmesan cheese, plus an extra tbsp. or so
2 eggs, beaten
8 oz. cooked pasta (I used Bucanti, a thick hallow spaghetti like noodle)
1 c. Swiss cheese, diced
3 green onions, sliced
1 tbsp. oregano
1 1/2 c. diced ham
1/2 c. diced tomatoes

Directions:

1. Preheat oven to 400 degrees. Place 2 tbsp. of butter in pie dish and place in oven until butter is melted. Sprinkle the pan with minced garlic.

2. Line the bottom and sides of the pie plate with French bread slices, overlapping the pieces which line the sides. Like this:

3. Microwave 2 tbsp. of butter in a microwave dish for 20 seconds. Drizzle over bread. Bake the buttery bread in the preheated oven for 5 minutes or until it becomes lightly browned. When done, lower oven temperature to 350.

4. Melt the remaining butter in a medium saucepan. Using a whisk, stir in flour. Slowly stir in milk while stirring with the whisk. Cook, continuing to whisk, until thickened.

5. Add some fresh ground pepper and the grated Parmesan cheese. Stir.

6. Add a bit of the sauce, about 1/2 cup, to the beaten eggs. Whisk, then pour the egg mixture into the rest of the sauce and whisk together. Set to the side for now.

7. Combine the pasta, Swiss cheese, about 1/2 of the sliced green onions, oregano and diced ham in a bowl. Pour sauce into bowl and toss to coat. Fill the tart crust with the pasta mixture.


8. Sprinkle the pasta with the diced tomatoes. Bake the tart at 350 for 25 minutes.

9. Remove tart from oven and sprinkle the tomatoes with a bit of Parmesan cheese and the remaining green onion slices. Grab a fork and enjoy! No need for a plate.


I served this with one of our favorite salads: spinach leaves, cucumber pieces, goat cheese and craisins. While making the tart, I had prepared the whole bag of pasta, 16 oz., and tossed it with olive oil and sea salt; my younger children do not much care for their pasta to be mixed with anything. They enjoyed the pasta and ham separate.

A last note: As I opened the oven door and captured the terrific scent of Swiss and Parmesan cheeses mixed with green onions and buttered toast, I knew this dish would also be excellent if made with crab or shrimp. Yumilicious!