
I used to have more time to plan somewhat lavish meals for guests. Like having 70+ people over without catering, making all the food and decorations myself with the help of one or two of my daughters. Those times seem to be fading quickly into the abyss of my blog and memory.
Sometimes the simplest gatherings are the most gratifying for me and most pleasing for my guests. But even the simplest gatherings should have something special. And special doesn't have to be labor intensive. Not even for an Easter brunch or a spring bridal shower. Really!
Two things to keep in mind are:
1. Use dependable recipes.
2. Use quality ingredients.
I have your covered on the first. The second is up to your local grocery, and you.
This recipe comes from a small recipe book from my favorite B&B. The collection of recipes is very much like one you would get from the ladies group at a church. They are pretty simple, with just one short paragraph of instructions. It is so simple, that many may overlook it when selecting an elegant dish for their spring entertaining menus. But it really deserves more than your consideration. It is delicious.
Remember, use quality ingredients. Using fresh and quality ingredients can almost always change any recipe into a star, even if you aren't a top chef. Trust me, I know from experience. So, before your begin, shop for your ingredients.

Fresh Produce
Use fresh lemon juice instead of bottled. Mince your own onion, don't use onion powder. Chop up some CRISP celery. Keeping your celery in water in the refrigerator keeps it crisp.
Flavorful Cheese
You may be tempted to skimp here, but use some nice Irish cheddar or something that is an aged, good cheese.
Good Crabmeat
Use lump crab meat that you find refrigerated. Not imitation. Not frozen. Not next to the canned tuna. I use Philips. It's good.

Now you are ready! Assemble the strata the night before. Put the dish, uncovered, a cold oven. Heat the oven then begin timing from there.
And be ready to give out the recipe. Everyone will want to make it once they find out how easy it is.
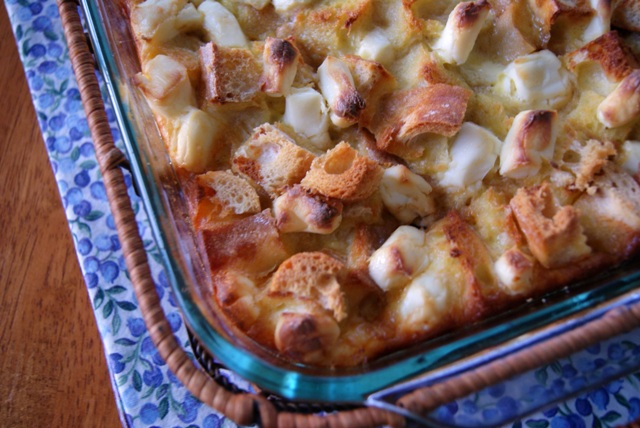
Simply Elegant Crab Strata
1 small loaf fresh sourdough bread, cubed {about 8 cups}
1 lb lump crab meat
1 c chopped celery
1 small sweet onion, chopped
1 Tbsp Dijon mustard
1/2 c real mayonnaise
juice from 1/2 lemo
1 tsp hot sauce
2 c grated sharp cheddar cheese
8 eggs, beaten
2 c milk
Grease a 9x13 or a 3 quart casserole dish. Spread the bread cubes in the prepared dish. In a large bowl combine crab, celery, onion, mustard, mayonnaise, lemon juice, and hot sauce; stir well. Using a blender or food processor (even a hand mixer), combine eggs and milk well. Add the egg mixture to the crab mixture and stir well. Pour over top of the bread cubes. Top with shredded cheese. Cover tightly with plastic wrap and refrigerate over night. In the morning, place dish in cold oven. Heat oven to 350F. Cook for an hour from the time oven reaches 350 or until lightly browned. Serve with additional hot sauce and lemon wedges.

Note- I made this recipe and divided it into two dishes. But, I recommend using just one 9x13 dish.
Sometimes the simplest gatherings are the most gratifying for me and most pleasing for my guests. But even the simplest gatherings should have something special. And special doesn't have to be labor intensive. Not even for an Easter brunch or a spring bridal shower. Really!
Two things to keep in mind are:
1. Use dependable recipes.
2. Use quality ingredients.
I have your covered on the first. The second is up to your local grocery, and you.
This recipe comes from a small recipe book from my favorite B&B. The collection of recipes is very much like one you would get from the ladies group at a church. They are pretty simple, with just one short paragraph of instructions. It is so simple, that many may overlook it when selecting an elegant dish for their spring entertaining menus. But it really deserves more than your consideration. It is delicious.
Remember, use quality ingredients. Using fresh and quality ingredients can almost always change any recipe into a star, even if you aren't a top chef. Trust me, I know from experience. So, before your begin, shop for your ingredients.

Fresh Produce
Use fresh lemon juice instead of bottled. Mince your own onion, don't use onion powder. Chop up some CRISP celery. Keeping your celery in water in the refrigerator keeps it crisp.
Flavorful Cheese
You may be tempted to skimp here, but use some nice Irish cheddar or something that is an aged, good cheese.
Good Crabmeat
Use lump crab meat that you find refrigerated. Not imitation. Not frozen. Not next to the canned tuna. I use Philips. It's good.

Now you are ready! Assemble the strata the night before. Put the dish, uncovered, a cold oven. Heat the oven then begin timing from there.
And be ready to give out the recipe. Everyone will want to make it once they find out how easy it is.
Simply Elegant Crab Strata
1 small loaf fresh sourdough bread, cubed {about 8 cups}
1 lb lump crab meat
1 c chopped celery
1 small sweet onion, chopped
1 Tbsp Dijon mustard
1/2 c real mayonnaise
juice from 1/2 lemo
1 tsp hot sauce
2 c grated sharp cheddar cheese
8 eggs, beaten
2 c milk
Grease a 9x13 or a 3 quart casserole dish. Spread the bread cubes in the prepared dish. In a large bowl combine crab, celery, onion, mustard, mayonnaise, lemon juice, and hot sauce; stir well. Using a blender or food processor (even a hand mixer), combine eggs and milk well. Add the egg mixture to the crab mixture and stir well. Pour over top of the bread cubes. Top with shredded cheese. Cover tightly with plastic wrap and refrigerate over night. In the morning, place dish in cold oven. Heat oven to 350F. Cook for an hour from the time oven reaches 350 or until lightly browned. Serve with additional hot sauce and lemon wedges.

Note- I made this recipe and divided it into two dishes. But, I recommend using just one 9x13 dish.


