Showing posts with label Easter. Show all posts

Sunflower Cheese Ball with Olives

Print Friendly Version of this pagePrint Get a PDF version of this webpagePDF
Sometimes I find a recipe, make it,  and my family loves it.  It becomes an instant hit.  Then I make it just about every week, or at least every month, until another recipe comes along and replaces it.  Sometimes, there is no replacement, but the recipe just doesn't fit as well in with the season.  As it is made less frequently, I might forget about using it.  Then one day, something reminds me of that favorite recipe.  I ask myself, "Why haven't I made that in forever?"  This is one of those recipes.


Cheese balls may seem so out dated, but this is really a good combination of flavors.  The olives are a great accompanying taste to the mild cheese.  The thing I really like about this cheese ball is the coating of roasted sunflower seeds.  Most cheese balls are covered with pecans or walnuts that are coarsely chopped.  The sunflowers are tender, both in texture and taste.  This is a terrific treat to make and have on hand for a spring time snack or for nibbles with some friends.  It is a great make ahead recipe for a shower, too!


Sunflower Cheese Ball
original recipe from allrecipes.com
8 oz cream cheese, softened
2 tsp Dijon mustard
2 c shredded Monterey~Jack cheese
1/2 c sliced green olives with pimentos
2 tbsp chopped green onions
1/2 c salted, roasted sunflower seeds
crackers {recommend pretzel thins}

Beat cream cheese and mustard until smooth.  Stir in the cheese, olives and green onions.  Shape into a ball.  Roll in sunflower seeds.  Refrigerate until time to serve.  Great with crackers, pretzel things and crisp veggies.

1.  Place the combined ingredients for the cheese ball on plastic wrap {makes it easy and neater}.


2.  Using your hands, gently shape into a ball.  Quick transformation from blob to ball.

3.  Sprinkle toasted sunflower seeds around ball.  Gently roll around to cover cheese ball with seeds.

4.  Refrigerate cheese ball til time to serve.  Transfer to serving plate.

5.  Surround with crackers or pretzel thins.


Tips and Tricks~
*Work with the cheese on plastic wrap.  Sprinkle seeds around and roll to easily cover cheese ball.
*Serve with carrot and celery sticks for a gluten-free or low-carb treat.
*Substitute other herbs in place of the green onions.  Try parsley or chives.
*Instead of a cheese ball, mix up the ingredients without the sunflowers.  Top pieces of toasted bread that have been cut into spring shapes with cookie cutters for a spring tea sandwich.

TJ's has my favorite pretzel thins, Everything Pretzel Thins!  Great with a cheese ball.

Make Ahead Brunch~ Simply Elegant Crab Strata

Print Friendly Version of this pagePrint Get a PDF version of this webpagePDF
I used to have more time to plan somewhat lavish meals for guests.  Like having 70+ people over without catering, making all the food and decorations myself with the help of one or two of my daughters.  Those times seem to be fading quickly into the abyss of my blog and memory.

Sometimes the simplest gatherings are the most gratifying for me and most pleasing for my guests.  But even the simplest gatherings should have something special.  And special doesn't have to be labor intensive.  Not even for an Easter brunch or a spring bridal shower.  Really!

Two things to keep in mind are:
1.  Use dependable recipes.
2.  Use quality ingredients.

I have your covered on the first.  The second is up to your local grocery, and you.

This recipe comes from a small recipe book from my favorite B&B.  The collection of recipes is very much like one you would get from the ladies group at a church.  They are pretty simple, with just one short paragraph of instructions.  It is so simple, that many may overlook it when selecting an elegant dish for their spring entertaining menus.  But it really deserves more than your consideration.  It is delicious.

Remember, use quality ingredients.  Using fresh and quality ingredients can almost always change any recipe into a star, even if you aren't a top chef.  Trust me, I know from experience.  So, before your begin, shop for your ingredients.


Fresh Produce
Use fresh lemon juice instead of bottled.  Mince your own onion, don't use onion powder.  Chop up some CRISP celery.  Keeping your celery in water in the refrigerator keeps it crisp.

Flavorful Cheese
You may be tempted to skimp here, but use some nice Irish cheddar or something that is an aged, good cheese.

Good Crabmeat
Use lump crab meat that you find refrigerated.  Not imitation.  Not frozen.  Not next to the canned tuna.  I use Philips. It's good.


Now you are ready! Assemble the strata the night before.  Put the dish, uncovered, a cold oven.  Heat the oven then begin timing from there.

And be ready to give out the recipe.  Everyone will want to make it once they find out how easy it is.


Simply Elegant Crab Strata
1 small loaf fresh sourdough bread, cubed {about 8 cups}
1 lb lump crab meat
1 c chopped celery
1 small sweet onion, chopped
1 Tbsp Dijon mustard
1/2 c real mayonnaise
juice from 1/2 lemo
1 tsp hot sauce
2 c grated sharp cheddar cheese
8 eggs, beaten
2 c milk

Grease a 9x13 or a 3 quart casserole dish.  Spread the bread cubes in the prepared dish.  In a large bowl combine crab, celery, onion, mustard, mayonnaise, lemon juice, and hot sauce; stir well.  Using a blender or food processor (even a hand mixer), combine eggs and milk well.  Add the egg mixture to the crab mixture and stir well.  Pour over top of the bread cubes.  Top with shredded cheese.  Cover tightly with plastic wrap and refrigerate over night.  In the morning, place dish in cold oven.  Heat oven to 350F.  Cook for an hour from the time oven reaches 350 or until lightly browned.  Serve with additional hot sauce and lemon wedges.


Note- I made this recipe and divided it into two dishes.  But, I recommend using just one 9x13 dish.

Savory Salmon Spread

Print Friendly Version of this pagePrint Get a PDF version of this webpagePDF
When choosing an appetizer or snack to have for small gatherings, I will often choose something that is served warm like spinach dip or meatballs.  Often I will need something a bit lighter before a full dinner though.  Sometimes I'll choose a seafood based appetizer when I need something lighter, like this crab salad.  But more often I want something even simpler.  One of my favorite snacks that is simple to pull together and is served chilled or at room temperature is Savory Salmon Spread.  It is perfect as an appetizer before a spring-time dinner, especially Easter or a Sunday brunch.


The flavor improves as the ingredients sit together, so I suggest making the spread the night before or at least two hours ahead of time.  Another tip~ use a stand mixer with the paddle attachment to blend the ingredients.  So easy.

I usually serve the spread with buttery crackers but it is just as scrumptious atop cucumber slices.  Low carb and gluten free!  I am partial to the canned tuna.  I know, lack of sophistication.  I think those who want to make this a bit more elegant can easily substitute about a cup of shredded smoked salmon.  I've even served this spread in mini fillo shells topped with some scallions for a bit more pizzazz.  This is a base recipe that can be adapted to your needs and tastes.  Enjoy!


Use mini cookie cutter to cut out cute spring~time shapes of cucumbers.


Pie shape cutters work too!

 Keep cut cucumber shapes in a glass jar filled with water in the refrigerator until serving.  Cucumber will be extra crispy!


Savory Salmon Spread
2 5 oz cans boneless and skinless salmon, drained with some liquid reserved
1 8 oz block of cream cheese, softened
1/2 tsp onion powder
1/4 tsp dried dill
pinch of salt
pinch of dried thyme

Blend all ingredients together well.  If too thick, add a bit of reserved liquid to thin.  Chill at least 2 hours.  Set out about 30 minutes before serving to soften.  Serve with buttery crackers or cucumber slices.


How to Make a Quiche and Create Your Own Recipe

Print Friendly Version of this pagePrint Get a PDF version of this webpagePDF
In a little college town in norther Idaho sits the best coffee house I have ever been to.  It's more than a coffee shop.  It's a study hall.  It's a pub.  And it has some of the best food I've ever enjoyed.  When I'm there, I get coffee and something for breakfast each day of my stay.  Sometimes I choose a cinnamon roll, which are always fresh, made from scratch and are only available to those who get there early.  More often I'll get a piece of crustless quiche.

Funny thing, I was never one to eat quiche.  I like eggs and will always have cheese when offered, but never cared much for quiche.  That changed when I ate a piece of the crustless veggie quiche that Bucer's offers.  It was so creamy and had the perfect ratio of eggs to cheese to vegetables.  And I'm certain that the absence of a crust was really a plus for selling me on quiche.


Since that first piece, I've ordered quiche over cinnamon rolls many times at Bucer's Coffehouse Pub.  I have also tried to recreate the quiche.  What I've learned along the way is how to build a quiche.  One of the best quiche recipes I made myself during this endeavor is a recipe for a spinach and feta quiche.

Rather than give you another quiche recipe {you could just go to the one I've mentioned above; it's quite good} I plan to help you learn to build your own quiche.  The beauty of not following a specific recipe is you can use what you have on hand.

I've found making quiche an excellent opportunity to use up cheese that I have remaining from entertaining.  And I am able to use up some of the bulk fresh ingredients that I get at Costo.  Have you ever bought a bag of fresh baby spinach or a container of mushrooms just to throw out half of them?  You could easily use them in a quiche of your own design.

Don't limit yourself to leftovers though, design a special quiche for an upcoming occasion.  They are wonderful for breakfast, brunch and even dinner.  You can make the day of your event as they come together quickly.  Just allow time for baking and to cool some.  Or, make the quiche a day ahead.  Remove from the refrigerator about an hour before serving to come to room temperature or reheat in the oven to serve warm.

Basics of Making a Quiche


Milk and Eggs~ 4 Eggs to 1 Cup Milk
The basics of every quiche is eggs and milk.  Keep this in mind while designing your quiche.  I like to do 4 eggs and 1 cup of half n half.  Have fun and try out different types of milk~ whole milk, half n half, cream or buttermilk are options.

When you are mixing the eggs and milk, you can use up to 6 eggs for a standard quiche.  Just increase the milk.  I suggest 4 eggs to 1 cup of milk, 5 eggs to 1.5 cups, and 6 eggs to 2 cups.

Cheese~ 2 Cups of Grated or Crumbled
Not a requirement of a quiche, but cheese is a wonderful addition.  With so many cheeses, quiche possibilities are limitless.  As a cheese lover, I use 2 cups of cheese.  Use any combination to add up to two cups.  In the quiche recipe I give below, I used four different cheeses.  Mostly I had many smaller amounts of cheese to use up.  You can also use a single type of cheese.  It's your quiche!  Any cheese that can be grated or crumbled works.  I would recommend that if you use a cheese with a strong flavor, use about 1/4 cup of it and then complete the 2 cups of cheese with a milder one.  Although, I really like strong flavors so I change that ratio sometimes.


Some tasty cheese combinations I've enjoyed:
Gruyere and Havarti
Cheddar and Blue Cheese
Feta and Gouda

Fillings~ 1~2 Cups or 1~2 Handsful
Meats and/or vegetables can be added to your quiche.  Meats are rather easy.  Make certain they are completely cooked and chopped.  Vegetables will need a bit more work as they are usually full of water.  Sauteing and patting vegetables dry will help remove excess moisture so that they work well in your quiche.  Tomatoes do well if you sprinkle them with a bit of salt, let sit then pat dry.

Classic fillings are ham or bacon, spinach, mushrooms and onions.  Try what you like though.  Have fun with it.  Don't forget to use some complimentary herbs and spices such as thmye, dill, garlic and pepper.  I do not recommend using salt as cheese usually is quite salty on its own.


Putting it all together.
Why no crust?  It adds time.  And calories.  Calories?  What about all that cheese and cream?!  Exactly.  I'd rather splurge on the cheese than the crust, but that is my personal preference.  Really, the crust takes more time when making a quiche.  Without the crust you have: 1. quicker prep time, 2.  less calories to indulge in the cheese, 3.  no gluten and low carb!  I see it as a win~win~win.

I recommend a pie dish especially since you have no crust.  The pie dish will hold all the ingredients together while it cooks.  When I made my first quiche, which was a crustless recipe, the directions were to use a spring-form pan.  Messy mistake.  There was nothing to hold the eggs and cream in the pan and it oozed out.  Big waste of ingredients.

Grease a pie dish, either standard or deep dish depending on the amount of eggs and milk you use.  Fill the bottom of the pie dish with the meats and/or vegetables.  Next, layer on the cheeses.  You could save some grated cheese for the very top.  Combine your milk and eggs with any seasonings you'll be using.  Use of a hand mixer will help blend the eggs well.  Pour the egg mixture over the cheese and other filling.  If you saved some cheese to top, scatter that on.  Bake in a 350F preheated oven for 45~60 minutes.  Again, it depends on the amount of eggs and milk you used.  If you use fewer ingredients, less cooking time and vice versa.  You want your quiche to be golden but not too solid.  You are aiming for a custard filling.

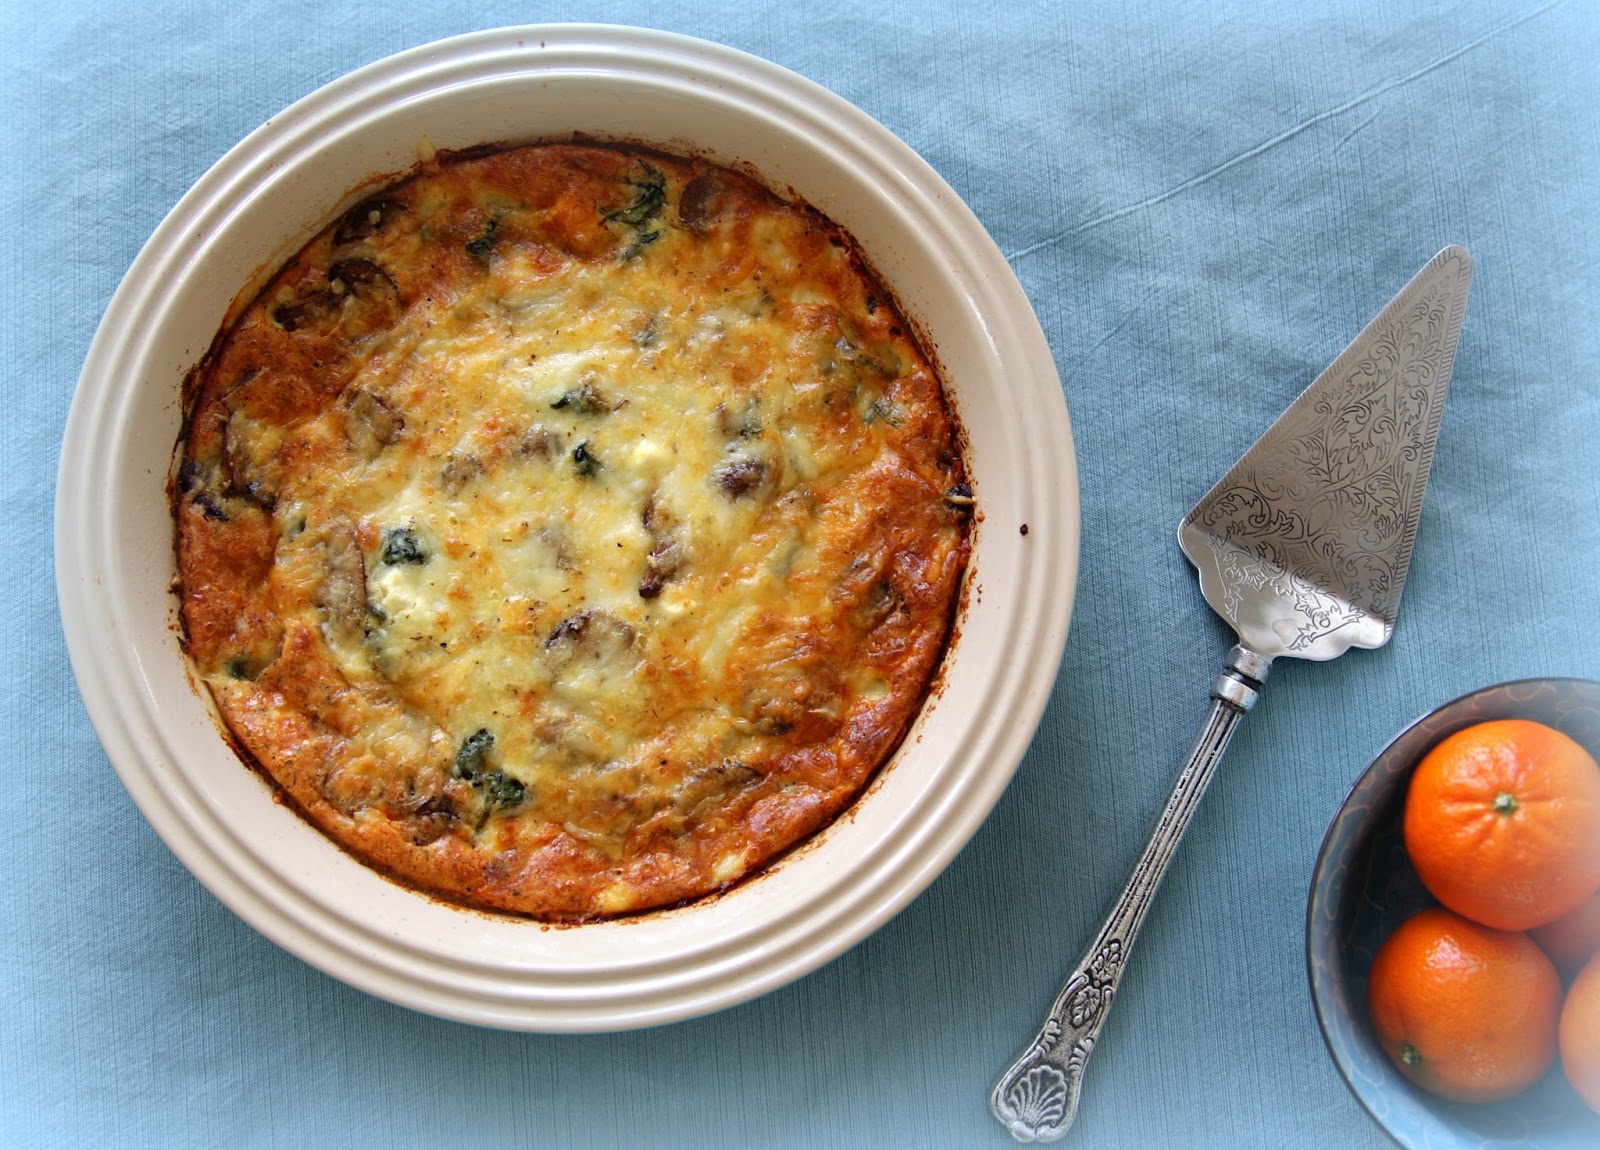
If you aren't quite ready to build your own quiche recipe, you can start with this one.  I used a combination of four cheeses which were the excess from a cheese plate at a recent brunch.  Some fresh spinach and mushrooms were used for filling and half n half rounded out my choices for this quiche.


Crustless Four Cheese Quiche
1-2 tbsp olive oil
8-10 oz fresh baby spinach
4 oz baby bella mushrooms, sliced
1/2 tsp salt
1/2 c crumbled feta
1/2  c shredded gruyere
4 eggs
1 c half n half
1/4 c grated parmesan
1/2 tsp dried thyme
1/2 tsp ground pepper
1/2 c shredded fontina

Preheat oven to 350F.  Grease a standard pie dish.
Place 1 tbsp olive oil in large skillet; heat over medium-high heat.  Add spinach and toss occasionally to wilt.  Once wilted, remove to paper towels.  Add remaining oil and mushrooms to skillet; sprinkle with 1/2 teaspoon of salt.  Saute for 5 minutes.

Squeeze excess moisture from spinach.  Scatter the spinach in bottom of prepared pie dish.  Top with mushrooms then feta and gruyere cheeses.  In large bowl, combine eggs, half n half, parmesan, thyme and pepper; blend well to combine {alternately, use a blender for this step}.  Pour egg mixture over ingredients in pie dish.  Top with grated fontina.  Bake in preheated oven for 45 minutes or until golden.  Let cool for 10 minutes before serving.


A Garden in a Nest~ DIY Floral Arrangment

Print Friendly Version of this pagePrint Get a PDF version of this webpagePDF
I have not been putting much thought or effort into my posts lately, but I have been enjoying life! Just this past Saturday, we were able to co~host a dance. I love gatherings~ friends and conversations, food and festivities, any sort of fellowship with others basically.

Whenever we host {or help to host in this case} an event, I like to plan food and decorations around a theme. For our first spring event I wanted a spectacular flower arrangement. After looking at many, I decided to basically copy this one from Martha Stewart: 


Original from Martha Stewart

As with anything done by Martha, the nest isn't quite as easy as she makes it seem. So I made my own version of this completely spring-time arrangement {as pictured at top of post}. Instead of weaving a nest I simply used a grapevine wreath and moss. In all I made three. Actually I did not make the two for the dance hall decorations. A helpful young lady asked what she could do, and I set her to work on them!

See what she created~


A garden in a nest.

My husband pointed out that he has never seen flowers growing out of nests, and our friend pointed out that maybe in heaven they will. Here is how to make a little bit of heaven.

Materials {to make one floral arrangement}
round plastic plate or dish
floral oasis, 1 1/2 blocks
1 grapevine wreath
Suggested flowers~
*3 Gerbera daisies
*3 roses
*2 bunches of tulips
*2 bunches of spray roses {about 4 stems each}
*3 hyacinths or lilacs
moss
plastic speckled eggs
feathers
an ornamental bird


A Garden in a Nest ~ Created for a spring brunch at my home.


Directions

1. Place larger block of oasis in the middle of the plate. Cut the 1/2 block into 2 pieces and place each on either side of the larger block, filling up the empty space on the plate. Run water over so that the oasis is soaked. Drain excess and wipe dry the bottom and sides of plate.
2. Place plate of oasis where you will have your arrangement displayed. Top with grapevine wreath.
3. Cut stems of the daisies and place in the middle of the oasis, leaving space between for roses.
4. Add roses, cutting the stems so they will be about the same height as the daisies.
5. Add a layer of tulips, using one bunch, outside of the daisies and roses. Again, leave space to be filled with other flowers.
6. Add spray roses between tulips and between roses and daisies.
7. Fill in spaces with remaining tulips and hyacinths.
8. Add moss to hide stems and oasis and finish the look of the nest.
9. Place a few eggs in the moss. Toss a few feathers around the "nest" and complete it all with a bird.

10. Add water to your arrangement daily, keeping the oasis moist.

You could easily change the look by using different flowers. This could also be made into a more permanent arrangement with silk flowers. One of the benefits of using floral oasis is the ease of which you can replace faded blooms with fresh ones while still enjoying the longer lasting flowers in the original arrangement.


Some tips on choosing flowers~
*Carnations last a very long time and come in many different colors.
*Spray roses last a bit longer than single stemmed roses and are often more fragrant and dry nicely.
*For more expensive flowers, choose a bold color and just three. They can be left at a longer length and be the focal point of the arrangement.
*Choose at least one flower that has wonderfully strong scent, such as a hyacinth or lily.