Showing posts with label How To. Show all posts

Pasta Salad, Create Your Own Recipe

Print Friendly Version of this pagePrint Get a PDF version of this webpagePDF
I've not been a fan of pasta salad oh, since, perhaps. . . I was born.  There are many reasons for that, but it is the truth.  Or was the truth.  Sometimes I am just a big kid with a picky palette.  And, in the past, pasta salad never pleased mine.  But, one day, something changed.

I really don't remember exactly how I decided to try pasta salad again.  Or even if I did try or if it was something my children wanted me to make (what?!).  Here we are though.  The weather is changing.  We have been sitting on the back deck enjoying dinners.  And my cravings have turned to pasta salad!


So, today, I finally whipped some up in the kitchen.  This isn't really a recipe, more of a method to create your own pasta salad recipe.  Maybe this is why my taste changed.  Long ago, back in that notorious decade of dinner in a box, pasta salad was just GROSS.  And it was usually creamy. Like a whole jar of Miracle whip gross.

For this method, you don't need to go there, unless you really can't stop yourself.  Just start with a box of pasta and your favorite dressing (highly recommend non creamy dressing).


I like to boil my pasta, then place it in a large wooden bowl.  While it is still hot, I add the dressing and toss to coat.  Why wood?  It doesn't conduct heat and the pasta cools off faster.  Why hot pasta?  It soaks up the dressing and makes the pasta oh so delicious!


While the pasta is cooling, I work on getting the rest of the ingredients prepared. I like to think of my pasta salad like a pizza.  I add meat, veggies and cheese.

Fist the veggies. If you are going with some that are really tough (like broccoli), I recommend blanching them.  And, if you are going with some that have a high water content, I suggest keeping them in some water in the refrigerator for at least an hour before using them.  Some of my favorite choices are cucumbers, olives, and onions.


My children really don't like this, but I love to use tomatoes.  Just a couple of plum tomatoes seeded and chopped.  And a tip, use a serrated knife to cut tomatoes.  They don't squish so much.


Once the pasta is cooled enough (to room temperature), I add the veggies and meat and toss well.  The colorful veggies make the pasta look so pretty.


The last step is to add some shredded cheese.  I do this after all the other ingredients to make sure that the pasta is completely cooled before adding.  Sometimes, I add the cheese just before serving so it doesn't soak up liquid and become too soggy.


Finally, I spoon the pasta salad into a stoneware bowl before chilling in the refrigerator for at least an hour and up to 2 days.  That makes this an excellent choice for summer entertaining and picnics.  The stoneware bowl will help keep the salad chilled when serving.


Create Your Own Pasta Salad Recipe

1 box 16 oz pasta
1 c favorite salad dressing
1/2 lb cooked meat (ham, chicken, turkey, etc.), chopped
1 1/2 cups assorted veggies, chopped
1 cup shredded, cubed or crumbled cheese
fresh herbs, slivered

Boil pasta according to package directions.  Drain; place in large shallow bowl.  Pour dressing over warm pasta.  Toss and let cool.  While cooling, chop and prepare other ingredients.  Add meat and veggies to cooled pasta; toss.  Add cheese and any fresh herbs; toss.  Move to stoneware or glass bowl.  Cover and chill until serving.

DIY Vintage Style Lego Shelf

Print Friendly Version of this pagePrint Get a PDF version of this webpagePDF
Do you ever feel like throwing away the Legos you find scattered all about the floor?  Does your child have so many Legos that you are certain he would never notice if you did throw away some of them?  I certainly have answered "Yes!" to both of these questions.

I have five boys who have all enjoyed playing with Legos.  This means that our collection has grown and accumulated over many, many years.  We even received a HUGE bin from my oldest son's friend (What, free Legos?  Of course we'll take them!).

Not only did we have an endless pile of Legos on the bedroom floor.  The youngest boys seemed to get completely frustrated with them because they could never find THE piece they were looking for.  Apparently one specific piece and none of the other 10,000 will do.

A couple of things happened lately and we have really solved our dilemma of what to do with the Legos.  And it didn't involve a trash can or donation truck.

First, we decided to put our house on the market after 12 years and many, many memories as well as many, many hours in traffic.  We are trying to move closer in and moving to a smaller house.  So, we had to de-clutter and reorganize somethings.  Including all the bedrooms and the toys.

Second, and most importantly, we moved the Legos out of the boys' bedroom.  Why on earth I never thought of this idea before is beyond comprehension.  The very best thing I have done in organizing my children's things (after having 9) is to insist that all toys, every single one, will be kept in one room of the house.  No toys in the bedroom!  This is revolutionary to a tidy and organized home with children.  I could go on and on about this, but let me just point out one more thing.  It encourages the children to play near me instead of alone in their bedrooms.  I actually like to be around my children.

Once I was seriously motivated to organize the Legos, I started finding help with how to categorize them.  Systems that were based on color categorizing really would not work for the amount of bricks and pieces we have.  And, my boys don't build by color.  I used this system from From Buckets to Bins.    He has some crazy helpful tips there. I did streamline his system a bit and used names my boys are more familiar with.

Once we started organizing, I needed to figure out the look I was going for.  I've seen so many ideas using Ikea shelves but didn't care for those.  Then I spotted this shelf at I Should Be Mopping the Floor.


It has such a vintage look even though it is brand new.  It was the look I had in the back of my mind and didn't know it til I saw it.  I did opt for finding a wooden shelf on craigslist but kept her idea of Dollar Store containers.

Here's what we came up with.


The shelf was $20 on craigslist.  It is solid wood and the shelves are adjustable.  I almost didn't get it because I was a bit creeped out by the seller's wording which I think he picked up on.  He offered to meet me in the police department parking lot in the middle of the day.  I accepted and am so glad!

The shelf has amazing details. The young man explained to me that it was made using wood salvaged from an old piano.


We sorted the Legos first into bricks, little pieces and odd pieces (anything not a brick and anything that wasn't tiny).  Then we further separated the bricks by size (1x, 2x2, 2x3 and so on), the odd into different categories and little pieces into figures, accessories and odd little pieces.

The sorted pieces are stored in square Dollar Store containers.  I liked the ones with silver lids.  Originally I envisioned painting the shelf with a zinc finish so the silver lids would match.  But I have been pleased with the original finish of the wood and decided not to paint it.

You can see some odd containers on the top shelf.  They are left over from a previous storage idea.  I like them but they are about $14 each which is a bit pricey.  The smaller containers are from the bath section at Target.  I plan to keep these as they are perfect houses for the tiny pieces.


Everything has been labeled with chalk labels I bought at Micheal's (with the exception of a few more containers awaiting sorting).  Some containers have different labels.  I had a variety on hand but have found the Recollection Brand ones (located in the sticker aisle at Michael's) to be preferred.  They are a good size.  They stick very well.  They are easy to write on.

I L-O-V-E the look! And even better, my husband was just thrilled with it.  He asked if we would keep it in the new house.  The answer is a definite YES.  Here I have it next to an old school desk with a silhouette.  I found the silhouette in our closet (while cleaning and organizing).  I remembered having one from my son's first grade teacher (he's now 17).  But when I checked the date (1974), I realized it was actually my husband!  We plan to hang the pictures in our new playroom once we are moved in.


We spent about $115.  It may seem like a bit much to some, but it was less than other systems I've seen and I really love the vintage look of it.  Here's the cost breakdown.

Shelf: Craigslist $20
Square Containers: Dollar Store $1 each
Large Round Containers (top shelf): Container Store $14 each
Chalkboard Labels: Michael's $4/9
Small Round Containers (top shelf): Target $3 each
Lego Prints: Amazon

Please share your great ideas or foibles on storing Legos!

DIY Sandwich Platters~ How to Make them Attractive

Print Friendly Version of this pagePrint Get a PDF version of this webpagePDF
Sandwich platters are an easy option for entertaining but can be rather boring or canned even if you make them yourself.  Without paying a local sandwich shop or deli to make your party platters, you can make your own from your favorite sandwich recipes or some that I've included below.

In the past I've made sandwiches and cut them up, arranged them on a platter and was quite dissapointed that they either looked just like the platters I buy or they looked like my 7 year old threw them together.  Not that my boy isn't talented.  He could be quite creative but quite messy, too.  Here is an easy trick to make diy sandwich platters eye catching without compromising the ease of putting them together~ leave space on the platter and fill in gaps with garnishes.  Actually, I think this is a quick method and will make any sandwich platter more appealing.
 

First, make your sandwiches.  If you are making a day ahead of time, you want to pair the bread with the proper ingredients so the sandwiches do not end up soggy.  For example, if you are using a spread you'll want a drier bread such as a Ciabata or crusty French.  Also, don't use fresh lettuce and tomato; leave those on the side.

Choose a platter.  Many platters are round and big.  If you are making only one kind of sandwich or similar sandwiches that can be stored overnight together without effecting the flavor, a large platter is fine.  I would use smaller and separate platters for different types of sandwiches, placing only one type of sandwich on each platter.

Also, line the platter with something that won't compromise the sandwiches, such as wax or parchment paper.  I keep deli sandwich paper on hand for lunches and use them to line a sandwich platter with.

Arrange sandwiches.  This used to be the difficult part about arranging a sandwich platter for me.  Then I realized the key to it all~ leave space between the sandwiches.  Don't try to layer them or overlapping in an effort to hide the platter itself.  Place the sandwiches flat on the platter so they don't smoosh each other.  Don't worry about the spacing between and parts of the platter showing.

Fill in gaps with garnish.  Choose a fruit or vegetable or non wilting herb to fill in gaps on the platter.  Look at ingredients of the sandwiches for ideas.  The muffaleta recipe uses a tapenade which has olives and peppers.   For the muffaleta platter, after cutting the sandwiches in halves I spaced them around a ramekin of olives.  the space between was filled in with mini sweet peppers.  The olives and peppers both add needed color to the platter.


The curry chicken salad croissants were also cut in half {halves make a nicer portion size for party platters}.  They were arranged in alternating rows with space left between so the delicate croissants wouldn't be smooshed.  The space was filled with green and red grapes.  Although this recipe doesn't use grapes in the chicken salad, they still compliment it nicely.


Here are two recipes to get you started on your own sandwich platters for your next party or get together.  For best flavor and texture, follow the cooking directions for the chicken used in the chicken salad.  I use this method whenever I am making chicken breasts to be used in another recipe.

Curry Chicken Salad Sandwich on Croissants

Ingredients
4 bone-in, skin-on chicken breast halves
1/2 teaspoon thyme
1/2 teaspoon salt
1/2 teaspoon pepper
1/2 teaspoon onion powder
1/2 c mayonnaise
1/2 c sour cream
1 tsp curry powder
1/2 tsp pepper
1/2 tsp salt
2 green onions, sliced
2 stalks celery, sliced
1/2 c dried cranberries
8 croissant rolls
red and green grape clusters for garnish

Preheat oven to 375F.  Rinse and pat-dry chicken; place in glass or ceramic baking dish. Combine thyme, salt, pepper and onion powder.  Sprinkle on chicken.  Roast in preheated oven for 1 hour.  Turn off oven and let chicken sit for 20 minutes before removing.  Once removed, place on cutting board and let cool for 10 minutes to ease handling.  Discard skin; remove chicken from bone.  Cut chicken into bite size pieces.  Set in bowl to the side.

Combine mayonnaise, sour cream, curry powder, pepper and salt.  Add to chicken and stir.  Add green onions, celery and cranberries.  Stir well.

Slice croissants from the back to the curled tips, leaving the tips intact {see pictures above}.  Fill the croissants well; lightly press down.  Slice in half.  Arrange on a platter and fill in gaps between halves with small grape clusters.  To make ahead, wrap tightly in plastic wrap and enjoy within 24 hours.


Italian Muffaleta with Tapenade

Ingredients
8 Ciabata rolls
1/2 lb mortadella
1/2 lb sandwich salami
1/2 lb sandwich pepperoni
8 slices mozzarella cheese
1/2 c tapenade
olives and mini sweet peppers for garnish

Slice Ciabata rolls in half horizontally {to open for sandwich making}.  Spread one tablespoon of tapenade on the middle of each bottom slice of the roll.  Add mozzarella, three slices of mortadella {I folded into fourths for a 'pie' shape then layered on}, three slices of salami and four slices of pepperoni.  Top with other half of roll.  Press lightly and slice in half.  Arrange on platter and garnish with olives and peppers.  To make ahead, wrap tightly with plastic wrap and enjoy within 24 hours.


How to Make a Quiche and Create Your Own Recipe

Print Friendly Version of this pagePrint Get a PDF version of this webpagePDF
In a little college town in norther Idaho sits the best coffee house I have ever been to.  It's more than a coffee shop.  It's a study hall.  It's a pub.  And it has some of the best food I've ever enjoyed.  When I'm there, I get coffee and something for breakfast each day of my stay.  Sometimes I choose a cinnamon roll, which are always fresh, made from scratch and are only available to those who get there early.  More often I'll get a piece of crustless quiche.

Funny thing, I was never one to eat quiche.  I like eggs and will always have cheese when offered, but never cared much for quiche.  That changed when I ate a piece of the crustless veggie quiche that Bucer's offers.  It was so creamy and had the perfect ratio of eggs to cheese to vegetables.  And I'm certain that the absence of a crust was really a plus for selling me on quiche.


Since that first piece, I've ordered quiche over cinnamon rolls many times at Bucer's Coffehouse Pub.  I have also tried to recreate the quiche.  What I've learned along the way is how to build a quiche.  One of the best quiche recipes I made myself during this endeavor is a recipe for a spinach and feta quiche.

Rather than give you another quiche recipe {you could just go to the one I've mentioned above; it's quite good} I plan to help you learn to build your own quiche.  The beauty of not following a specific recipe is you can use what you have on hand.

I've found making quiche an excellent opportunity to use up cheese that I have remaining from entertaining.  And I am able to use up some of the bulk fresh ingredients that I get at Costo.  Have you ever bought a bag of fresh baby spinach or a container of mushrooms just to throw out half of them?  You could easily use them in a quiche of your own design.

Don't limit yourself to leftovers though, design a special quiche for an upcoming occasion.  They are wonderful for breakfast, brunch and even dinner.  You can make the day of your event as they come together quickly.  Just allow time for baking and to cool some.  Or, make the quiche a day ahead.  Remove from the refrigerator about an hour before serving to come to room temperature or reheat in the oven to serve warm.

Basics of Making a Quiche


Milk and Eggs~ 4 Eggs to 1 Cup Milk
The basics of every quiche is eggs and milk.  Keep this in mind while designing your quiche.  I like to do 4 eggs and 1 cup of half n half.  Have fun and try out different types of milk~ whole milk, half n half, cream or buttermilk are options.

When you are mixing the eggs and milk, you can use up to 6 eggs for a standard quiche.  Just increase the milk.  I suggest 4 eggs to 1 cup of milk, 5 eggs to 1.5 cups, and 6 eggs to 2 cups.

Cheese~ 2 Cups of Grated or Crumbled
Not a requirement of a quiche, but cheese is a wonderful addition.  With so many cheeses, quiche possibilities are limitless.  As a cheese lover, I use 2 cups of cheese.  Use any combination to add up to two cups.  In the quiche recipe I give below, I used four different cheeses.  Mostly I had many smaller amounts of cheese to use up.  You can also use a single type of cheese.  It's your quiche!  Any cheese that can be grated or crumbled works.  I would recommend that if you use a cheese with a strong flavor, use about 1/4 cup of it and then complete the 2 cups of cheese with a milder one.  Although, I really like strong flavors so I change that ratio sometimes.


Some tasty cheese combinations I've enjoyed:
Gruyere and Havarti
Cheddar and Blue Cheese
Feta and Gouda

Fillings~ 1~2 Cups or 1~2 Handsful
Meats and/or vegetables can be added to your quiche.  Meats are rather easy.  Make certain they are completely cooked and chopped.  Vegetables will need a bit more work as they are usually full of water.  Sauteing and patting vegetables dry will help remove excess moisture so that they work well in your quiche.  Tomatoes do well if you sprinkle them with a bit of salt, let sit then pat dry.

Classic fillings are ham or bacon, spinach, mushrooms and onions.  Try what you like though.  Have fun with it.  Don't forget to use some complimentary herbs and spices such as thmye, dill, garlic and pepper.  I do not recommend using salt as cheese usually is quite salty on its own.


Putting it all together.
Why no crust?  It adds time.  And calories.  Calories?  What about all that cheese and cream?!  Exactly.  I'd rather splurge on the cheese than the crust, but that is my personal preference.  Really, the crust takes more time when making a quiche.  Without the crust you have: 1. quicker prep time, 2.  less calories to indulge in the cheese, 3.  no gluten and low carb!  I see it as a win~win~win.

I recommend a pie dish especially since you have no crust.  The pie dish will hold all the ingredients together while it cooks.  When I made my first quiche, which was a crustless recipe, the directions were to use a spring-form pan.  Messy mistake.  There was nothing to hold the eggs and cream in the pan and it oozed out.  Big waste of ingredients.

Grease a pie dish, either standard or deep dish depending on the amount of eggs and milk you use.  Fill the bottom of the pie dish with the meats and/or vegetables.  Next, layer on the cheeses.  You could save some grated cheese for the very top.  Combine your milk and eggs with any seasonings you'll be using.  Use of a hand mixer will help blend the eggs well.  Pour the egg mixture over the cheese and other filling.  If you saved some cheese to top, scatter that on.  Bake in a 350F preheated oven for 45~60 minutes.  Again, it depends on the amount of eggs and milk you used.  If you use fewer ingredients, less cooking time and vice versa.  You want your quiche to be golden but not too solid.  You are aiming for a custard filling.

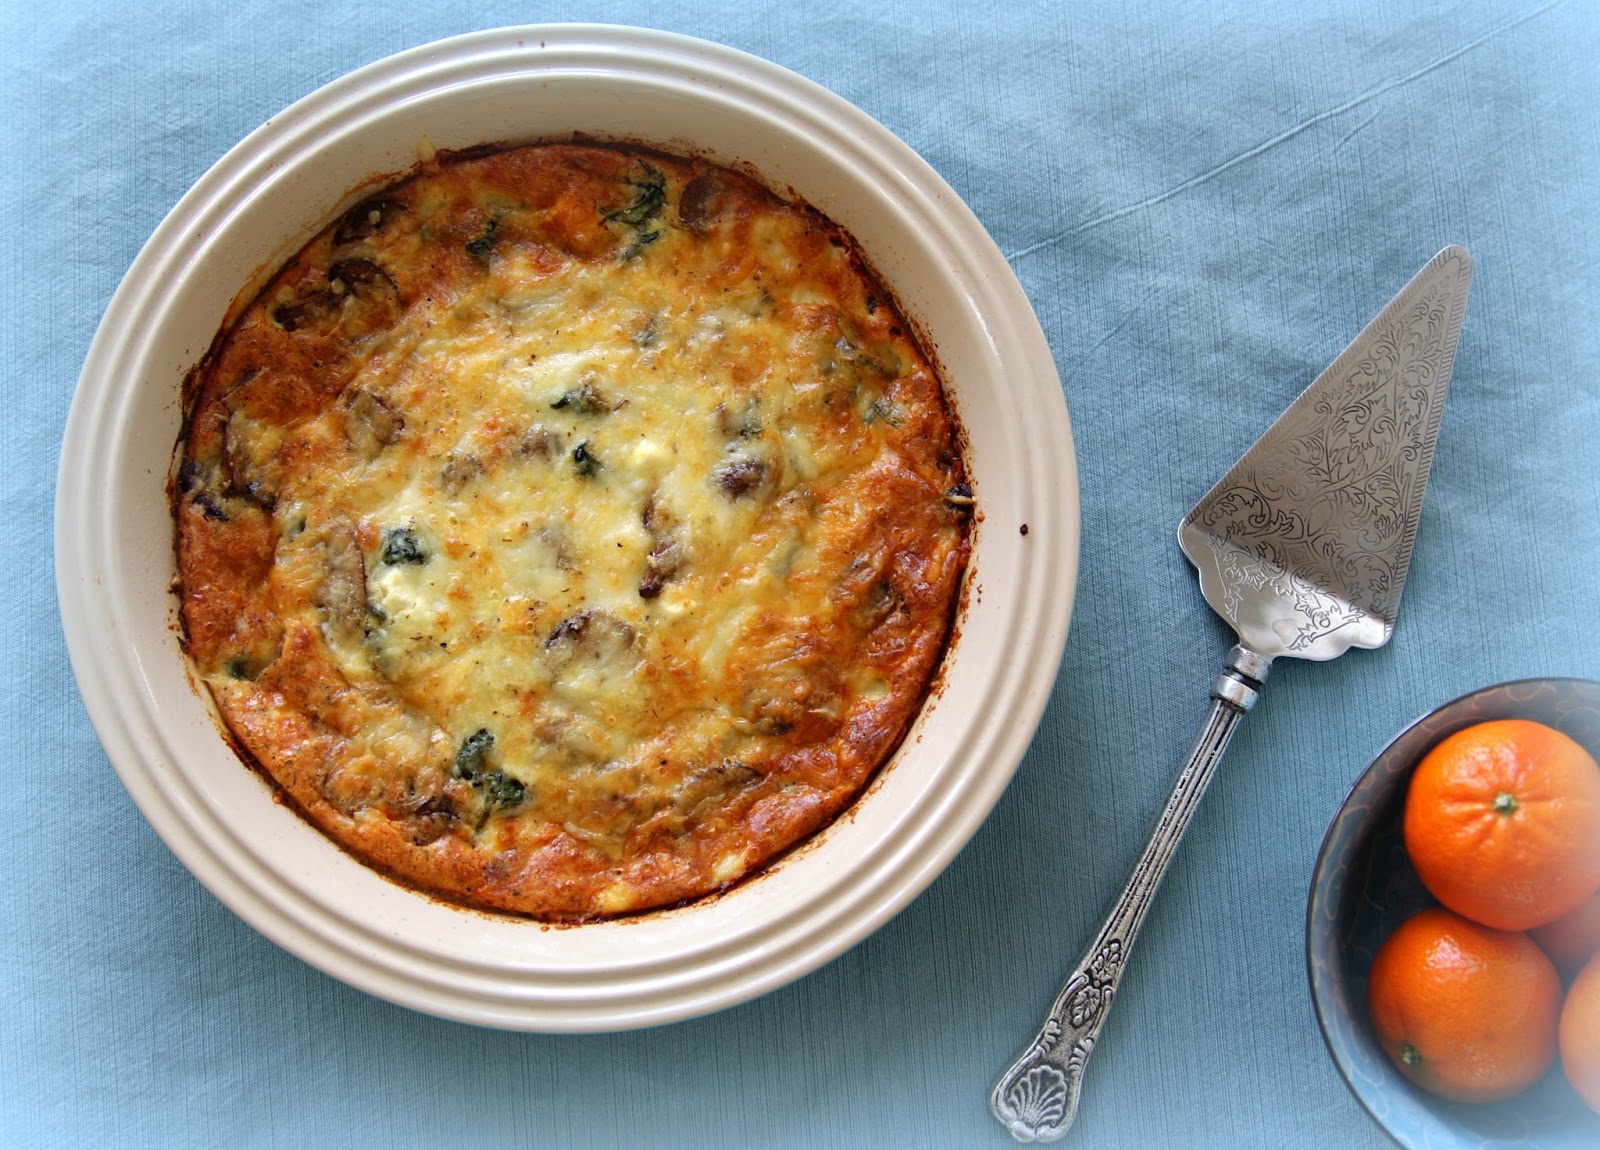
If you aren't quite ready to build your own quiche recipe, you can start with this one.  I used a combination of four cheeses which were the excess from a cheese plate at a recent brunch.  Some fresh spinach and mushrooms were used for filling and half n half rounded out my choices for this quiche.


Crustless Four Cheese Quiche
1-2 tbsp olive oil
8-10 oz fresh baby spinach
4 oz baby bella mushrooms, sliced
1/2 tsp salt
1/2 c crumbled feta
1/2  c shredded gruyere
4 eggs
1 c half n half
1/4 c grated parmesan
1/2 tsp dried thyme
1/2 tsp ground pepper
1/2 c shredded fontina

Preheat oven to 350F.  Grease a standard pie dish.
Place 1 tbsp olive oil in large skillet; heat over medium-high heat.  Add spinach and toss occasionally to wilt.  Once wilted, remove to paper towels.  Add remaining oil and mushrooms to skillet; sprinkle with 1/2 teaspoon of salt.  Saute for 5 minutes.

Squeeze excess moisture from spinach.  Scatter the spinach in bottom of prepared pie dish.  Top with mushrooms then feta and gruyere cheeses.  In large bowl, combine eggs, half n half, parmesan, thyme and pepper; blend well to combine {alternately, use a blender for this step}.  Pour egg mixture over ingredients in pie dish.  Top with grated fontina.  Bake in preheated oven for 45 minutes or until golden.  Let cool for 10 minutes before serving.


New Year's Eve Countdown Cookies

Print Friendly Version of this pagePrint Get a PDF version of this webpagePDF
Here's an easy way to add some festivity for children to your New Year's Eve~ Countdown Cookies!  I am certainly no master cookie baker or decorator but these are relatively simple {as far as shaped and decorated cookies go}.  I use a basic sugar cookie dough.  It's a great recipe to use when you will be decorating cookies with sprinkles or frosting since the dough isn't too sweet.  There are a plethora of recipes and tips out there for cookies, but I'll give you some of my own to add to them since I really suffer in the shaped cookie making department.


*When making your cookie dough, do not add all of the flour called for.  Wait and see how the dough balls up.  You may not need all the flour.  If your dough is too dry {too  much flour} the cookies will crumble.  Baking is affected by the humidity in the kitchen as well.  Just add a half cup at a time {already mixed with the baking powder} until the dough starts pulls together in a ball.
*Have cookie trays, sprinkles, cookie cutters and any other equipment you will be using ready to go before removing dough from refrigerator and beginning to roll.
*Work with half or a third of the dough at a time, leaving remainder of dough in the fridge.  Soft dough is your enemy when rolling and cutting cookies.
*Transfer cut cookies from work surface to prepared cookie sheet using a large metal spatula.  You can easily tear excess dough from around the shaped cookie after the spatula is carefully slid underneath of shape.
*Use powdered sugar on cookie cutters and spatula edges to 'flour', making removal of dough easy from cutter edges.
*Don't use leftover dough {from around the cut shapes} for more cookies.  Conserve space when doing initial cutting.
*Sprinkle cookies with sugar crystals once they are on the tray but before they are baked.  Don't worry about extra sugar crystals around the the edges.  Lightly press them into the cookies to keep in place while baking.
*Place cookie trays in freezer for 10 minutes before baking to help keep cut shapes while baking.


We save our small frappuccino and juice bottles to make festive drinking containers on such occasions as these.  Add party ribbon and curl.  The final touch is a festive straw in colors to match the occasion.

Another easy yet festive decoration is a 'clock' plate.  Any plastic plate {or inexpensive ceramic plate} will do.  Use a permanent marker to mark the numbers around the plate edge.  I found it worked best to start with 12, 6, 3, then 9 and fill in the remaining numbers.  The children will love snacking on these New Year's Eve Countdown Cookies as they wait to ring in the new year!


New Year's Eve Countdown Cookies

1 c unsalted butter, left at room temperature for 45~60 minutes
1 c white sugar
1 large egg, room temperature
1 Tbsp vanilla
2 1/2 c white flour
1 tsp baking powder
powdered sugar {for working with dough instead of flour}
tinted sugar crystals for decorating

Blend butter and sugar in stand mixer til grainy but smooth.  Scrape sides of bowl with rubber spatula; add egg and vanilla.  Blend well, scraping sides and bottom of bowl again to incorporate all ingredients.

In separate bowl, combine flour and baking powder with a whisk.  Working with a half cup at a time, blend into creamed butter and sugar.  Once the dough starts to pull together into a ball, remove from bowl.  Working on lightly floured surface {with powdered sugar}  shape dough into a smooth disc.  Wrap in plastic wrap and refrigerate for an hour {dough should be firm but not too hard}.

Preheat oven to 350F.  Prepare cookie sheets {I like to line with foil and spray with a nonstick spray}.  Roll cookies to 1/4" thickness.  Cut, using a bit of powdered sugar on cookie cutters to keep from sticking.  Transfer to prepared cookie sheets.  Place cut cookies, on cookie sheets, in freezer for 10 minutes before baking.  Bake in 350F for 8~10 minutes, until edges begin to brown.  Cool on cookie sheet 2 minutes before transferring to cooling rack.  Makes enough dough for about 2 dozen large {2"~3"} cookies.


I don't throw out the leftover but allow my younger children to use them for making their own sugar cookies.  They did all the rolling, shaping, cutting and sprinkling them selves and there were no worries about wasted dough or mistakes.  And a multitude of sprinkles hides any mistakes!

Cranberry Pistachio Snack Mix

Print Friendly Version of this pagePrint Get a PDF version of this webpagePDF
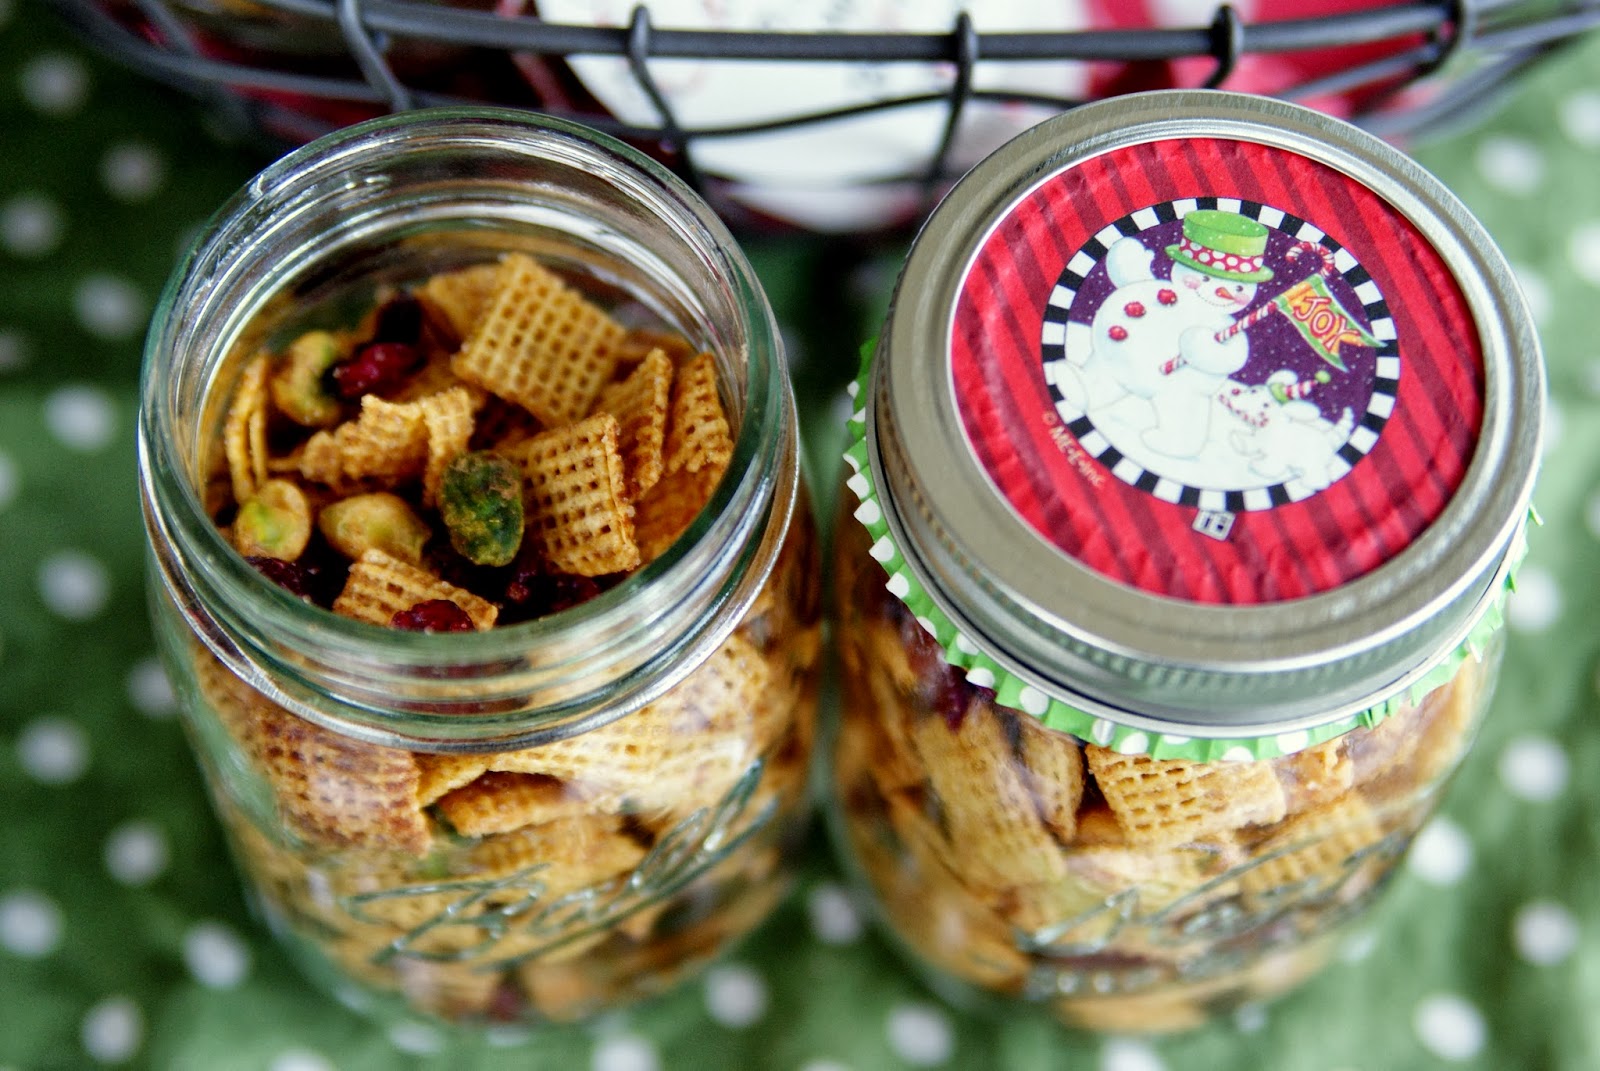
Need a small gift for someone such as a teacher or teacher's helper, or a neighbor?  Here's a sweet and salty holiday snack mix that you can make today.  It's simple.  It's tasty. It's gluten free!
teacher gifts, neighbors, church friends, anyone you may need a small gift for


All you need is a something to package it in.  I suggest mason jars to show of the contents with its festive colors {red cranberries and green pistachios}.  A jar can quickly be dressed up with a cupcake liner on top.  I always have a few leftover after baking.  You can even add a tag with an ingredients list to clarify for allergens.  If you want to avoid nut allergies, just leave the pistachios out; it will still be a sweet treat from your home.


Cranberry Pistachio Snack Mix
1/4 c white sugar
1 tsp ground cinnamon
1/4 c butter, melted
6 c Chex cereal {recommend rice}
3/4 c dried cranberries
3/4 c shelled pistachios

Whisk or shake together sugar and cinnamon.  Pour cereal into a large bowl.  Pour half of the butter over the cereal; toss.  Pour remaining butter and stir well to coat cereal.  Sprinkle with half the sugar and cinnamon mix and stir; repeat with remaining sugar mix.  Toss in cranberries and pistachios; toss to combine.  Store in airtight container.  Makes 4 pint size mason jar gifts.


Free Crochet Pattern~ Itty Bitty Bow Beanie

Print Friendly Version of this pagePrint Get a PDF version of this webpagePDF
I really never expected to be away from blogging for so long.  After my baby girl was born, I knew it would be a while before I got back into blogging but really did not see it taking over a year and a half to get a couple of posts in.

I feel like I'm almost ready to start doing some fun things around my house again and even have the energy to share some of those things with you.  Before I get to those, I'd like to share with you a crochet pattern I wrote MYSELF.  Emphasis on myself because I have been crocheting my short fingers away the past 2+ years and have both loved and hated many patterns.  I realize that I am not always the greatest pattern reader and therefore assume I won't be the greatest pattern writer.


Anyway, here is my first pattern~ Itty Bitty Bow Beanie.  I made this for my little girl, who is petite for her age, thus the small size.  I found a picture tutorial for crocheting a bow but the added notes were in French.  Being too lazy to translate, I just decided what I thought should be going on and it worked for me.  If you have trouble with this pattern, let me remind you it is FREE!  And, you can ask questions.  If you are completely lost but love the hat, just buy one from my Etsy shop, An Extra Blessing!  This would make a wonderful Christmas gift for a special baby girl.


Itty Bitty Bow Beanie

3 Month Size {Should fit 0~6 month range}*
H Hook
Caron Simply Soft Yarns {or similar yarn}
All terms are US.

R1:  In magic ring, ch 1; 12 sc in ring {12 st}
R2:  Join with sl st to top of first sc {not ch}; ch 1; *sc and dc in ea st* around {24 st}
R3:  Join with sl st to top of first sc; ch 2; *dc in first st, sc in next st* around {24 st}
**R4: Join with sl st to top of first dc; ch 1; *sc in first dc; 2 dc in next sc* around {36 st}
R5:  Join with sl st to top of first sc; ch 2; *2 dc in first sc; 1 sc in ea next dc* repeat pattern around {48 st}
R6:  Join with sl st to top of first dc; ch 1; *sc and 2 dc in first st; skip two st; repeat pattern around, joining with a slip st to top of the first sc {48 st}
R7:  Join with sl st to top of first sc; ch 1; *sc and 2 dc in first st; skip two st; repeat pattern around, joining with a slip st to top of the first sc {48 st}
R8~12: Repeat round 7.
R13: Repeat round 6 up to the last 2 dc. HDC in last 2 dc then sl st to first sc in previous round.
R14:  With second color, ch 1 and sc in ea st around; join to ch 1 with sl st.
R15:  Ch 1, sc in ea st around.  Fasten off and weave in ends.

For Bow~
In magic ring, ch 4; 3 trc; ch 4; sc in ring; ch 4; 3 trc; ch 4; sl st in ring.
Ch 8; hdc in 2 ch from hook; hdc in next 3 st; sc in remaining; sl st in ring; repeat.
Pull magic ring closed; turn bow to wrong side; use beginning tail to wrap bow; cut leaving a long tail.
Tie the two tails of yarn into a knot on back side (right side) of bow; trim shorter tail.  Use long tail to sew bow onto hat brim.

*Note about Size ~
Quite sorry I've not been keeping up the blog and getting more specific instructions for increasing the size.  Here is a link to the Ravelry project page for this hat.  There are some who have increased the size simply by using a larger hook or by doing one more row of increase {which I know is more difficult mathematically}.  Have a look and I hope to one day get a larger pattern written up!

Ravelry Itty Bitty Project Page

**Update~ 
For those having trouble at rows 4 and/or 5, here is an explanation that some found helpful.  For more helpful tips, read through some of the comments below those post, too.
"With row 4 you are getting the 36 count right? Once row 4 is completed, you should have a pattern of 1 sc, 2 dc repeating. So, when you work row 5 you are working *2 dc into sc, 1 sc in dc, 1 sc in dc* for a 4 stitch pattern.

Maybe check and see if you were doing what Brooke said she was doing. In row 5 instead of the *2 dc, 1 sc, 1 sc* she was working 2 dc, 1 sc, 2 dc, 1 sc, . . . so she was getting more increase.
"


As I said, this is my first written pattern for others.  I write my work for myself and know how many stitches I should use for a certain hat size.  So here goes my first gauge explanation as well.

Gauge ~ 24 st x 10 rows = 6" x 4"
To work gauge, using H Hook


Ch 26; sc in 3rd ch from hook and in ea remaining st across{24 st}.
R1: Ch 1, turn; *{sc,2dc} in first st, skip 2 st* repeat to end; sc in last st.
R2: Ch 1, turn; *{sc, 2dc} in sc, skip 2 dc* repeat to end; skip last 2 dc and sc in last sc.
Repeat row 2 nine more times.
Ch 1, turn, sc in ea st across to complete swatch.
6" {24 st} x 4" {10 rows of shell + 2 rows sc}

Nesting

Print Friendly Version of this pagePrint Get a PDF version of this webpagePDF
Lately I have been depleted of most of my energy due to a little one that should be arriving within the next couple of weeks. Mostly my daily routine consists of short periods of normal activity {laundry, picking up after my toddler and reading the same book to him over and over and over} alternated with longer periods of sitting with my feet up. These times of rest have not been completely unproductive. Not only are they allowing me to have ankles for part of the day, I've taken a refresher course in crocheting.

Refresher course is not completely accurate seeing as I learned to crochet when I was about eight years old and haven't really crocheted since then. Thanks to Pinterest {Am I wrong in assuming you've heard of it?}, I came across http://www.craftyminx.com/crochet-school/ on Craftyminx's site as well as a few crochet patterns.

The Crochet School is well organized and, for any other visual learners out there, she has all of her lessons in video {for both right and left handed}. I did not watch every single video before I began my first real crocheting project in quite some years. Instead, I worked through a pattern for this baby hat. Whenever I was a bit confused, I referred to the applicable Crochet School lesson for the instruction I was working through. After the hat was complete {after my second attempt; I didn't like the first one}, I used this pattern for the flower and added it on. The hat was done in a short part of the day.


I was quite pleased with my little hat for my baby girl. I've packed it {along with a cute outfit of course} so she can wear it home from the hospital. I made a couple of the hats actually, but I am in love with these colors~ turquoise and coral. One of the nicer things about this hat is it can be made with a finer yarn so that it is fine to wear in the summer ; with all of the spaces, it is rather airy.

Hopefully soon I'll have a picture of my little one modeling this hat, as I feel I have gone into full swing nesting {making hats, blankets, reorganizing the kitchen and family room}.  I'm also hoping to get up a tutorial for the taggie blanket there in the background {it was so simple but fun to make}.  And if you are interested in seeing what else I have found on Pinterest or added to my boards, hop over and look at my pins.